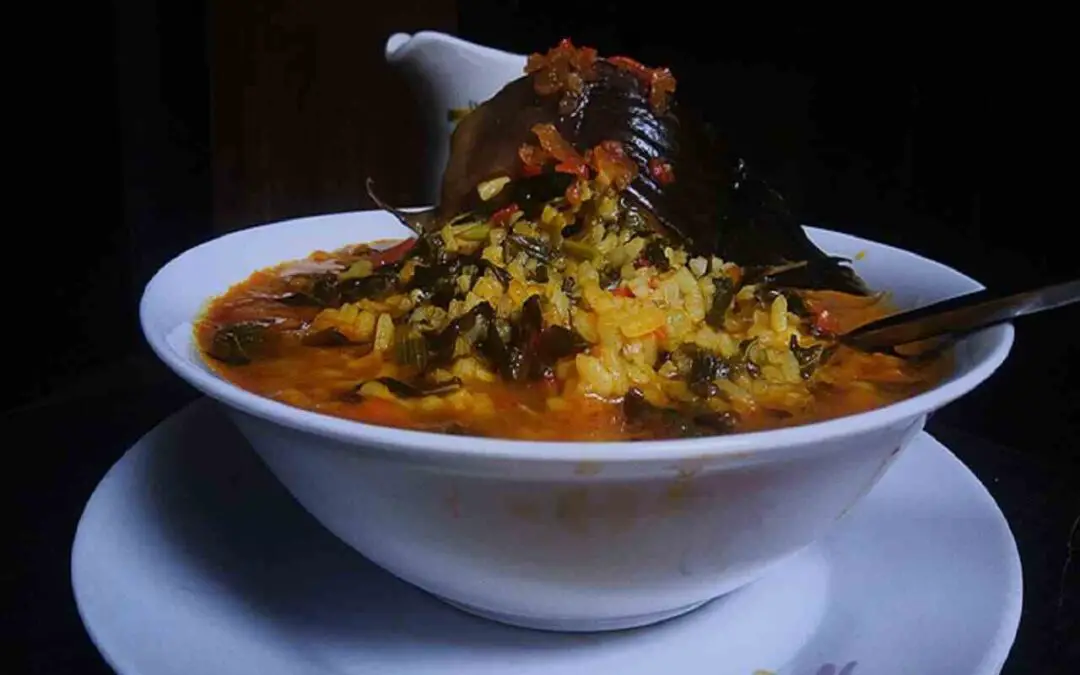
Fate is a Hausa term that means “anything in a watery form,” and shinkafa means “rice.” Therefore, Faten Shinkafa refers to a meal made using braised rice. The letter ‘n’ in the word ‘Faten’ simply denotes ownership. In this post, I’ll share my knowledge of how to prepare Faten Shinkafa (yadda ake Faten Shinkafa) with you.
Faten Shinkafa is a highly tasty cuisine with many nutritious benefits, primarily consumed by Hausas in northern Nigeria. Only those who have tried this recipe can fully appreciate its mouthfeel. You should give it a shot as well.
3 cups of braised rice Fresh tomatoes, pepper, and onion Vegetable oil or palm oil Beans (optional) Spinach and jute leaf Crushed groundnut Cow bones or meat Seasoning cubes and salt to taste ¼ of cooked pumpkin (kabewa) 7 cups of water
Procedure for Making Faten Shinkafa
STEP 1: Mash the tomatoes, peppers, and onions in a blender.
STEP 2: Thoroughly wash, chop, or cut your spinach and jute leaves.
STEP 3: Cook your beans until they are almost done, and then set them aside.
STEP 4: In a clean saucepan over medium heat, combine the bones or meat, seasonings, curry, and onion slices, and cook until the meats are tender. Set it aside after you’re finished.
STEP 5: Place another pot containing 7 cups of water over medium heat. Bring to a boil, then stir in the braised rice.
STEP 6: Combine the braised rice with the oil of your choice. If you want, you can combine the two.
STEP 7: Stir in the cooked beans and the contents of STEP 4 thoroughly. Allow 15 minutes for cooking.
STEP 8: Next, combine your cooked pumpkin (kabewa), spice cubes, and salt to taste in a large mixing bowl. Allow for a 5-minute simmer.
STEP 9: Stir in the chopped spinach and jute leaves, as well as the sliced onions. Allow 3 minutes for cooking.
STEP 10: Remove from the heat and serve immediately.
How to Serve Faten Shinkafa
Faten Shinkafa is generally served on trays and at a high temperature, allowing it to cool more quickly. Serve it with slices of onions and daddawa pepper (ground pepper mixed with locust beans). Man Shanu (cattle oil) can also be added to improve the aroma. For a well-balanced diet, keep a glass of table water handy.
Oh, I’m salivating already.
Occasions to Serve Faten Shinkafa Best
It’s best served at naming ceremonies or the day following a wedding. You can enjoy this dish for lunch or dinner—the option is yours!
How to Store Faten Shinkafa
It’s ideal to eat Faten Shinkafa within 24 hours of cooking it. Refrigeration is not recommended unless you have a microwave to warm it up when you want to eat it.
Nutritional Value of Faten Shinkafa
Faten Shinkafa, like maize, is an energy-giving food since it gives us the energy we need to get through our daily activities. It’s similar to Shashshaka in nutritional content.
As you can see, making Faten Shinkafa (yadda ake yin faten shinkafa) is a piece of cake—it’s not difficult at all. It’s incredibly sweet, and you’ll keep wanting more. Why don’t you try it for yourself? I’m convinced you’ll be able to do this for yourself or your family with just one trial. I’d appreciate it if you could share your experience in the comments below.
Kosan Rogo is one of the various northern cuisines that many love. Its major ingredient is cassava. It is easy to make and tastes great when done well. Kosan rogo, also called Dan na rogo or Wainan rogo can be done in two major ways: either by using cassava flour or fresh cassava. This article seeks to teach you how to make Kosan Rogo using two different ways of making it: fresh cassava and cassava flour.
3 cups of cassava flour Fresh pepper and onions (ground) Spices (curry, thyme, and garlic) Vegetable oil for frying Seasoning cubes and a pinch of salt Hot water
How to Make Kosan Rogo (with Cassava Flour)
STEP 1: Sieve the cassava flour and set it aside.
STEP 2: Grind the pepper and a little onion. Also, slice your onions into small pieces.
STEP 3: Add STEP 2 to the sieved flour and mix it well.
STEP 4: Add the seasoning cubes, salt, and spices, and mix with hot water until you have a sticky mixture.
STEP 5: Cover the mixture and set it aside for a few minutes.
STEP 6: Get a clean frying pan, turn on your cooker, and put it on it. Add your vegetable oil and add a few sliced onions to the oil. Allow frying for 3 minutes.
STEP 7: Make the cassava mixture round or flat and add it to the frying pan. Allow frying for 5 minutes.
STEP 8: Get your frying spoon, flip it to the other side, and let it fry until it turns golden brown.
STEP 9: Use the frying spoon to get the fried Kosan Rogo into a sieve.
STEP 10: Scoop the fried pieces onto a clean bowl to cool.
STEP 11: Ta-da! Your Kosan Rogo is ready to be served.
3 tubers of cassava Fresh pepper and onions (ground) Spices (curry, thyme, and garlic) Vegetable oil for frying Seasoning cubes and salt to taste.
Procedures for Making Wainan Rogo with Fresh Cassava
STEP 1: Put the cassava tubers in a clean container and add enough water to soak for an hour.
STEP 2: When well soaked, peel the cassava with a knife. Just be careful not to injure yourself.
STEP 3: Cut the peeled cassava into small chunks, wash them properly, and keep them aside.
STEP 4: Here, you could either pound the chunks using a mortar and pestle or you could just use a grater. Any one of the two will do a good job. However, a mortar and pestle will yield a faster result.
STEP 5: After pounding or grating, pour the content into a clean bowl and add ground onions and pepper. Mix them very well.
STEP 6: Grind it with a blender and sieve, and squeeze out the water.
STEP 7: Put it into an empty bowl and then add the seasoning cubes, spices, salt to taste, and sliced onions. Mix them very well until well combined.
STEP 8: Fetch the mixed cassava, pour it on your palm, and make a small ball. Use your two palms to flatten it. Repeat the same process until all of the dough or mixture is exhausted.
STEP 9: Put on your cooker and put a clean frying pan on it. Pour your vegetable oil and a few slices of onions into it. Allow frying for 3 minutes.
STEP 10: Add STEP 8 one by one into the frying pan (just enough to fit the oil in the pan). Allow them to fry for 5 minutes until they turn golden brown, then flip them over so that the other sides will fry.
STEP 11: Repeat the above process until all contents in STEP 8 are exhausted.
STEP 12: Use a spoon to get the fried Kosan Rogo into a sieve.
STEP 13: Scoop the fried pieces onto a clean bowl and allow them to cool.
STEP 14: Ta-da! You are done!
How to Serve Kosan Rogo
Dan na rogo can be served hot or allowed to cool before serving—your choice. It is mostly served with ground pepper or ketchup.
Occasions to Serve Kosan Rogo Best
Wainan rogo can be served any time of the day. It could be served as breakfast with pap, Kunun Tsamiya, or Kunun Gyada.
How to Store Kosan Rogo
Store it in a clean place and cover it. This can make it last for 5 days. Alternatively, you can store it in a refrigerator, which makes it last for more than 2 weeks.
Preferably, prepare just enough for present consumption. As you have seen, Dan na rogo is easy to make.
If you follow the steps thoroughly, you should be able to have a perfectly made Koson Rogo.
Surprisingly, Kosan Rogo, or Kosan Garin Rogo, has been dying out recently as many people don’t consume it much. This doesn’t definitely have to do with its taste, but perhaps there are other reasons.
Mothers and sisters, try making this for yourselves and your families to bring back the fame this Northern Nigerian cuisine had far back in the late 90s. Please share your experience with us in the comments section below.
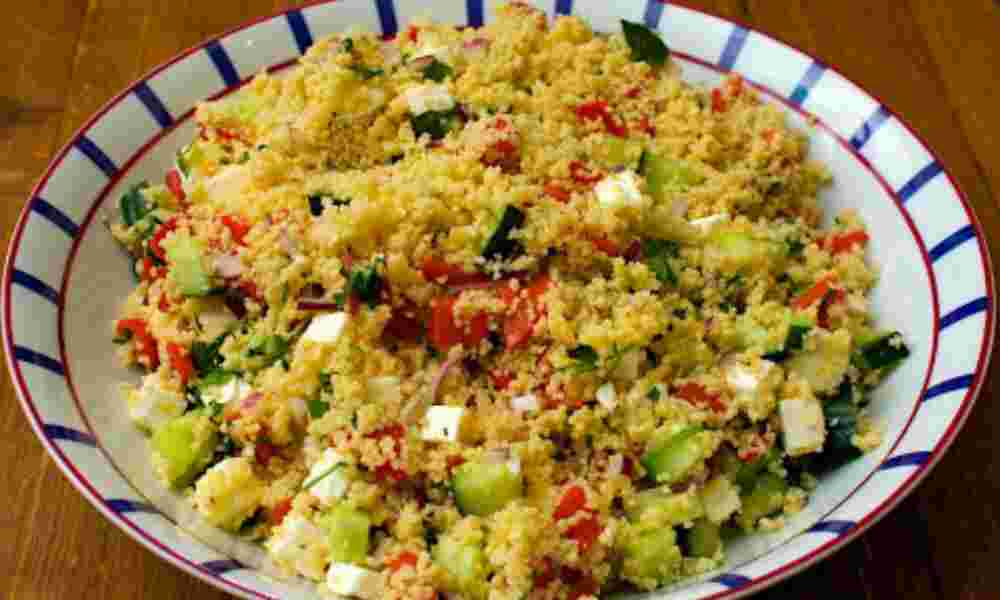
Dambun Shinkafa otherwise known as Rice Couscous is a northern Nigerian delicacy and is widely consumed by northerners. The recipe is made with braised rice. I love this recipe and I learned how to prepare it from my stepmother.
5 cups of rice 1 bunch of moringa leaves Fresh pepper 3 moderate-sized onions 4 tablespoons of fried groundnut Seasoning cubes and salt 1 cup of vegetable oil (optional) Cabbage and cucumber (optional) Little water
Procedure for Making Dambun Shinkafa Recipe
STEP 1: First, put your rice in a tray, remove the stones, and braise.
STEP 2: Pour the rice into a blender and blend not to powder form but just enough to crush all the rice.
STEP 3: Turn the braised rice into a clean bowl and soak it for 20 minutes.
STEP 4: Pick the moringa leaves from their stalk, wash them, and set them aside.
STEP 5: Pound or grind the pepper, slice the onions, and set them aside too.
STEP 6: Wash the rice properly and drain it. After that;
STEP 7: Get your cooker, turn it on, and put your local steamer on it.
NB: The local steamer consists of two pots—the one below and the one above. The one below is just like a normal pot but the one above (which is usually inserted into the one below) is perforated at the bottom and then has a lid. See the picture below:
STEP 8: Pour water into the lower pot and insert the second pot into it. Get a clean piece of rice bag and cover the perforated area of the pot above.
STEP 9: Add your braised rice to the rice bag and spray a little water on top of the rice. Get your linoleum and cover the top of the rice, then close the pot and allow it to steam for 40 minutes.
STEP 10: When the rice gets soft, pour the cooked dambu rice into a bowl and allow it to cool for 5 minutes.
STEP 11: Add the moringa leaves and sliced onions to the bowl. Also, add the grinded or pounded pepper and a little salt. Stir everything well with a wooden spoon.
STEP 12: Spread the content from STEP 11 into the pot again. Allow it to steam up for 15 minutes. When done, take it down.
STEP 13: Put a clean, empty pot or frying pan on the heat and add the vegetable oil and chopped or sliced onions. Allow frying for 3 minutes.
STEP 14: Pour the cooked dambu into a clean bowl, add the seasoning cubes, curry, and salt to taste, and stir very well.
STEP 15: Pour the fried oil on top of the dambu and mix it again very well until every ingredient is properly mixed.
STEP 16: Dish on a plate and garnish with cabbage, onions, cucumber, groundnut, and grinded pepper, and eat.
How to Serve Dambun Shinkafa Recipe
Serve it preferably on a bowl-like plate and garnish it with cabbage, onions, cucumber, groundnut, and sweet yaji (grinded pepper).
Dambun Shinkafa recipe is best served hot with a chilled bottle of water to go with it and also to avoid cases of choking.
Occasions to Serve Dambun Shinkafa Best
Dambun Shinkafa can be served any day, any time. However, it is mostly prepared on Kauwaya Day, which is usually done one day before a wedding ceremony in Hausa communities.
How to Store Dambun Shinkafa Recipe
This delicacy can be stored locally by spreading it on a tray or bowl and covering it with a sieve to allow fresh air to enter. This can make it last for a day.
You can also store it in a refrigerator and it can last for a few more days.
This concludes Dambun Shikafa recipe. If the above-mentioned steps are followed strictly, there won’t be any mistake in having a perfectly made Dambun Shinkafa.
In addition to how it can be served, instead of using fried groundnut, you could alternatively use grinded Kuli-Kuli (Garin Kuli), made from groundnut cake.
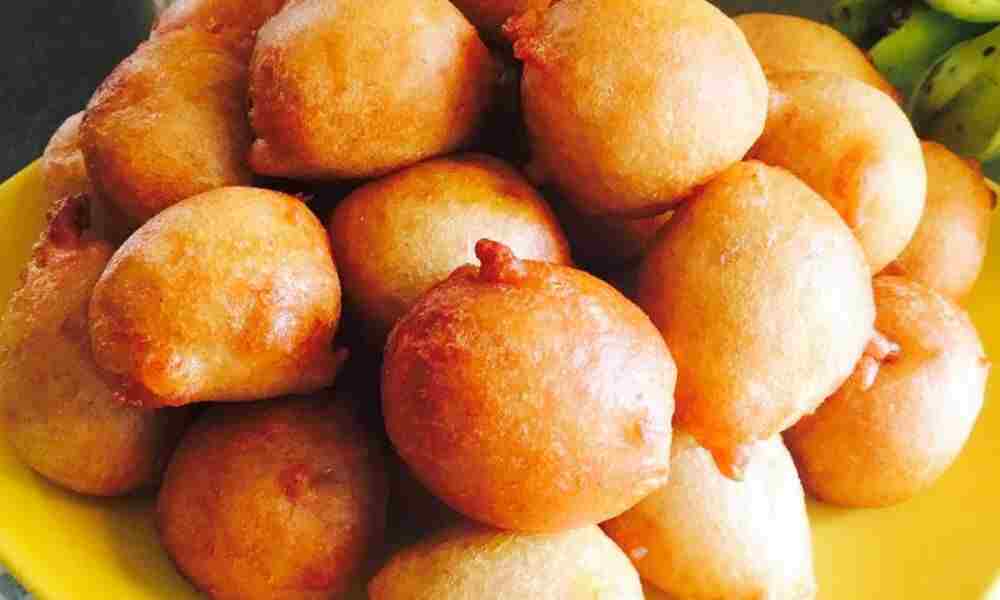
Fanke, commonly known in English as Puff Puff, is a snack consumed by all, regardless of tribe, ethnicity, or financial status. Most people love it. Its major ingredient is wheat flour or semovita. The procedure for making Fanke with any major ingredients is the same.
3 cups of wheat flour or semovita 1 cup of sugar 1 tablespoon of yeast A pinch of salt Vegetable oil Vanilla flavor ½ tablespoon of baking powder 2 cups of warm water
Procedure for Making Fanke
STEP 1: Sieve the wheat flour or semovita into a clean bowl to remove tiny stones.
STEP 2: Add the sugar, yeast, salt, flavor, and baking powder to the sieved flour.
STEP 3: Add warm water and mix them until you have a smooth batter that is not too hard or thick.
STEP 4: Cover the bowl keep it in a warm place and allow it to rise for about 40 minutes. The yeast makes it possible to rise.
STEP 5: Over medium heat, put in a clean frying pan, pour the vegetable oil and a few slices of onions, and allow to fry for 2 minutes.
STEP 6: Dip your hand into clean water and start molding the batter into balls and dropping them into the hot oil on the fire. Repeat this process until all the batter is exhausted.
STEP 7: Fry until they turn golden brown.
STEP 8: Get a clean frying spoon to get the fried Fanke (Puff Puff) into a sieve container.
STEP 9: Pour the fried pieces onto a clean bucket or container and allow them to cool.
STEP 10: Ta-Da! Your fanke is ready for consumption. Enjoy!
How to Serve Fanke
You can eat it while it is hot (that’s why I prefer to take it) or you could allow it to cool first before taking it. It is served with any drink of your choice, like Kunun Gyada, Zobo, Kunun Tsamiya, Kunun Zaki, and the like.
Occasions to Serve Fanke Rice Best
It can be made as a snack to celebrate ceremonies like weddings and naming ceremonies or for festive periods.
It could also be consumed as breakfast, brunch, or dessert.
How to Store Fanke
It can last up to 3 days when stored in a cool, dry place and a few more days when refrigerated. However, it is not advisable to refrigerate because you can never get its actual taste when you decide to eat it, even of course, after warming or microwaving.
Fanke recipe is a wrap. It is easy to make as not much hard work is needed to prepare it. Try making it at home for yourself or your family, and tell us about your experience in the comments section below.
Note that when mixing the mixtures, ensure it is not too hard because that will make molding with one’s hand very difficult, and the frying will take a lot of time.
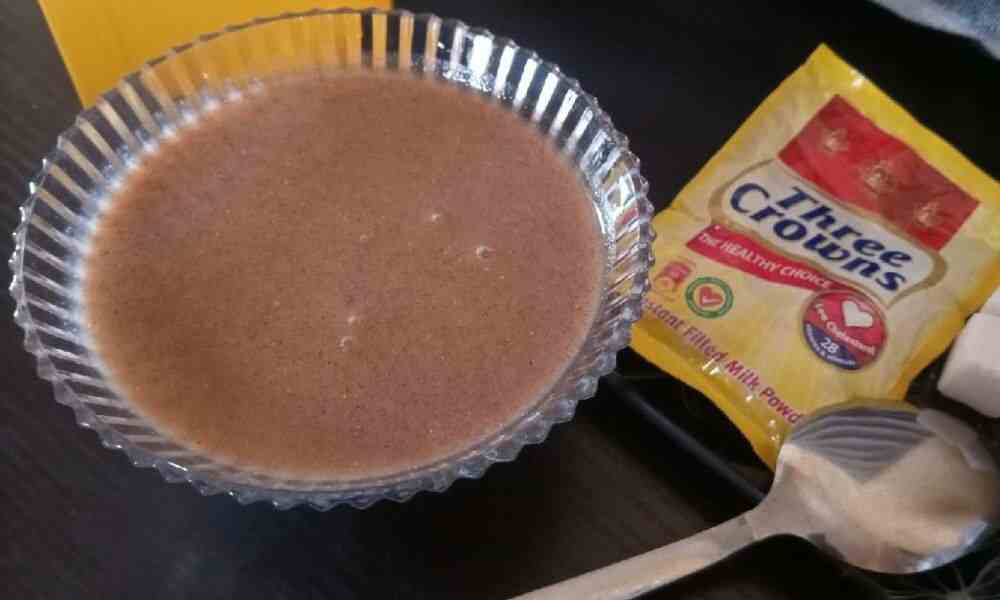
Kunun Tamba is usually called Finger Millet Porridge in English. It is made using finger millet (Eleusine coracana L.) which is an important millet grown extensively in various regions of India and Africa and constitutes a staple food for a large segment of the population in these countries.
This delicacy is widely consumed in the northern part of Nigeria (Arewa). On this note, I would like to teach you how to make Kunun Tamba (yadda ake kunun tamba). Don’t worry as it is easy to make and it tastes delicious when properly done.
4 cups of Tamba (finger millet) 1 cup of short-grained rice (optional) Powder milk (optional) 3 pieces of dried ginger and cloves Sugar to taste Water (desired quantity) A little tamarind (tsamiya)
Picture of Tamba Seed
The picture below is what Tamba seed or finger millet looks like:
STEP 1: Get a clean bowl and pour the Tamba inside it. Add water wash it properly and set it aside. Be extra careful while washing it as it is too tiny.
STEP 2: Wash the white rice and set it aside too.
STEP 3: Get a clean mat, pour the Tamba and white rice, and spread them to dry up for about 1 hour.
STEP 4: When dried, pack it properly and put it inside a container. Add your ginger and cloves to it and take it to the grinders. If yours is in small quantity, you could use a blender instead.
STEP 5: After grinding, allow it to cool for 10 minutes
STEP 6: While waiting, you could wash your tamarind (tsamiya) and soak it for 20 minutes. For a faster result, you could just soak it with hot water for just 5 minutes.
STEP 7: Now sieve the grinded Tamba powder and set it aside.
STEP 8: Put a clean pot over your cooker, lit it add water to the pot, and allow it to come to a boil.
STEP 9: Fetch the Tamba flour and put it in a clean bowl that can contain it.
STEP 10: Add a little soaked tamarind to the flour and mix properly to form a paste. Ensure the paste isn’t too thick or watery.
STEP 11: When the water in the pot has boiled, take it down and pour the hot water into the bowl that contains the Tamba paste.
STEP 12: Mix well as you add the boiling water to avoid lumps. Continue doing that until it is well cooked and has reached your desired thickness.
STEP 13: When done, add your desired amount of sugar and powdered milk and mix.
STEP 14: Your Kunun Tamba is ready for consumption.
How to Serve Kunun Tamba
Kunun Tamba is preferably served in a cup while still hot. Varieties of snacks could go with it such as Cin Cin, Sinasir, Wainar Fulawa, Fankasau, etc.
You could choose to take it alone. All good.
Occasions to Serve Kunun Tamba Best
Kunun Tamba recipe is often taken as breakfast. However, it is suitable for consumption any day any time.
You could make it for Iftar (at the time of breaking a fast) or Sahur (before starting a fast) during Ramadhan.
It is also known to increase the breast milk of nursing mothers.
How to Store Kunun Tamba
Kunun Tamba recipe normally lasts for just a day if you don’t include milk in the ingredients. With milk, it only lasts for an hour.
To avoid this and for convenience, you could just make enough for the present need.
Kunun Tamba is very delicious and very easy to prepare. If you carefully follow the above procedure, you should be able to arrive at the actual Kunun Tamba recipe you intend to have. Try to make yours and you will actually testify to its preparation’s easiness and delicious taste.
I hope this piece is worthwhile to you. If it is, kindly drop a comment in the comments section below.