Some combinations of foods are just amazing and will make you wonder, ‘Who first thought of preparing this food?’ Dawa da Wake is a northern Nigerian recipe mostly consumed by the Hausas. It is a combination of guinea corn (dawa) and beans (wake) to produce a finger-linking, sumptuous meal that will make you crave more after you first taste it. In this article, I will be teaching you how to make Dawa da Wake (yadda ake Dawa da Wake).
The following ingredients are needed when preparing Dawa da Wake:
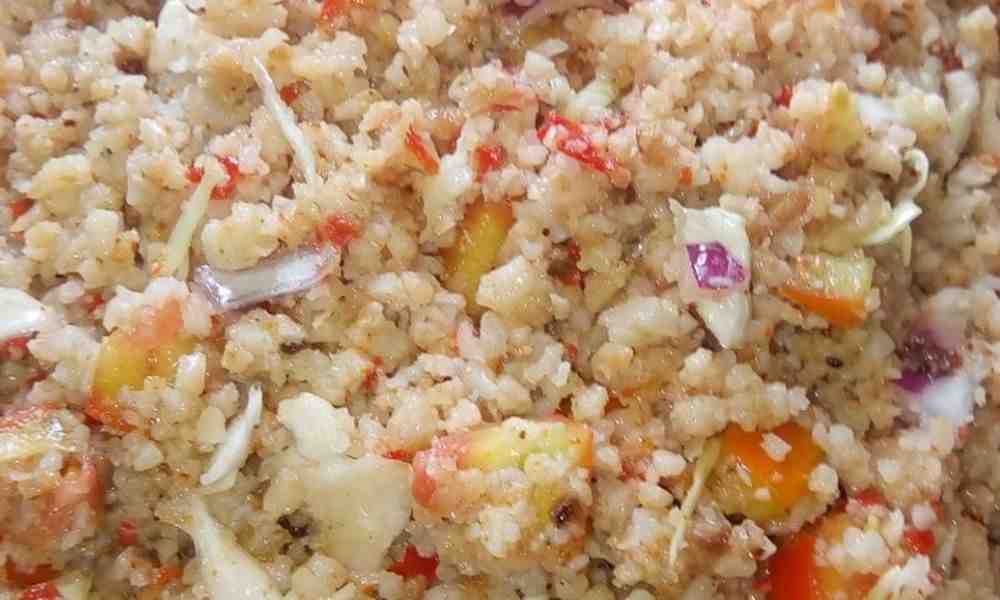
Dawa (guinea corn) Wake (beans) Palm oil Kuli Kuli (groundnut cake) Water Salt, Maggi, cabbage, spinach, onions, and tomatoes
Procedure for Preparing Dawa da Wake
STEP 1: Get a big mortar and pestle, pour the guinea corn seeds into it, sprinkle a little water on it, and then pound for like 30 minutes. This is called surfe in the Hausa language.
STEP 2: Pour the pounded guinea corn (dawa) into a large tray and try separating the seeds from the shaft. This is called bakace in Hausa.
STEP 3: Wash the guinea corn very well and drain it, then set it aside.
STEP 4: Over medium heat, put a clean pot, add your beans to it, and allow 10 minutes of cooking time. Then;
STEP 5: Pour the guinea corn and allow to cook for 40 minutes together with the beans
STEP 6: Turn off the heat, pour in a warmer, and set it aside. Then;
STEP 7: Slice your onions, tomatoes, and spinach and set them aside.
STEP 8: Get a clean mortar and pestle and pound the groundnut cake (Kuli-Kuli) until it is slightly coarse in texture. Then;
STEP 9: Get a frying pan over medium heat and fry the contents in STEP 7 for 5 minutes.
STEP 10: Ta-da! Your Dawa da Wake is ready for consumption.
How to Serve Dawa da Wake
Dawa da Wake is best served hot with a chilled drink of your choice.
Occasions to Serve Dawa da Wake Best
Dawa da Wake is mostly consumed or eaten as a basic meal (lunch, breakfast, or dinner). It is hardly served on grand occasions like weddings, birthday parties, festivals, etc.
How to Store Dawa da Wake
It can last for many months without refrigerating as long as it is kept in a safe place away from children and rodents.
Dawa da Wake is easy to make. The only stressful part is removing the shaft of the guinea corn seeds (i.e., the surfe part). We all know that pounding is not easy, and this one takes minutes to achieve the desired result, depending on the quantity you intend to have.
You could just prepare this meal in jollof form.
I’m optimistic that this piece was worthwhile for you.
Anyway, that’s a wrap for this delicious meal. Now that you know how to make Dawa da Wake (yadda ake Dawa da Wake), why don’t you try making it for yourself or your family and tell us your experience in the comments section below?
Tubani recipe is another northern Nigerian dish that is primarily consumed by Hausas. It is prepared using three (3) different methods, just like Gauda, as a result of the differences in the ingredients used.
It can be made with masara and waken soya (maize and soya beans); also, it can be made with white beans and maize alone. In this tutorial, I’ll show you how to prepare Tubani using three distinct methods. Please stick with me!
How to Make Tubani Recipe with Masara and Soya Beans
Ingredients
2 cups of maize 2 cups of soya beans 4 spoons of baobab leaf powder (Kuka) A small piece of potash (kanwa) Powdered pepper Vegetable, palm oil, or soup Maggi
Procedure for Preparing Tubani with Masara and Waken Soya
STEP 1: Remove the dirt from the maize and soya beans and thoroughly combine them. (In Hausa, the word cakudawa means mixing.’)
STEP 2: Grind or blend the ingredients until finely ground, then filter into a basin or container. Then,
STEP 3: Soak and set aside the potash.
STEP 4: Thoroughly combine the contents of STEP 2 with the kuka (Baobab leaf powder).
STEP 5: Pour the potash into the bowl and thoroughly mix it in.
STEP 6: Next, slowly drizzle in the water while mixing to make a dough that is neither too thick nor too thin.
STEP 7: Fetch the dough with your hand and mold it to the shape you want then set it aside.
STEP 8: Continue until all of the dough has been used up.
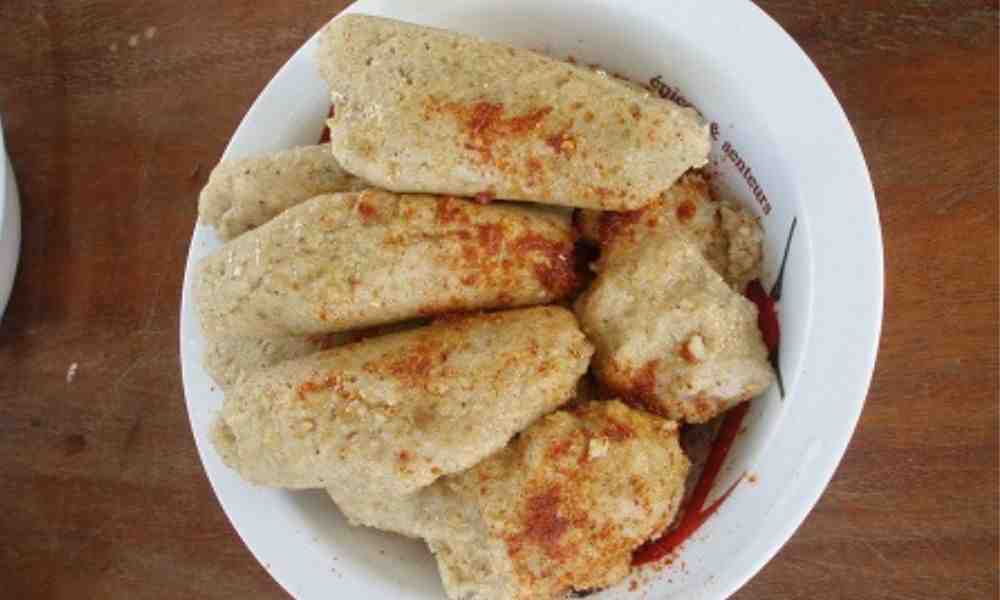
STEP 9: In a clean saucepan over medium heat, pour water, place the contents in STEP 7 in the pot, and cover the pot with the lid. Allow for 40 minutes of cooking time, just like Danwake.
STEP 10: Scoop the Tubani one by one after turning off the heat and put in a clean warmer.
STEP 11: Fry your oil for only 2 minutes (vegetable or palm oil).
STEP 12: Your Tubani with masara and wake is ready!
How to Make Tubani Recipe with Masara and White Beans (Farin Wake)
Ingredients
2 cups of beans 2 spoons of baobab leaf powder (Kuka) A small piece of potash (kanwa) Powdered pepper Vegetable or palm oil or soup Maggi
Procedure for Preparing Tubani with Wake (Beans)
STEP 1: Separate the beans from the dirt.
STEP 2: Fill a clean basin halfway with water and soak the beans for 10 minutes.
STEP 3: Rinse the beans thoroughly to remove the grain shafts.
STEP 4: Immediately after washing, blend or grind it to produce a thick dough.
STEP 5: Add the maggi into the dough and thoroughly mix.
STEP 6: Fetch the dough with your hand and mold it to the shape you want then set it aside. Repeat the same process until the entire dough is exhausted.
STEP 7: Over medium heat, get a clean pot, pour water into it, arrange the content in STEP 6 in the pot, and cover the lid of the pot. Allow to cook for 40 minutes just like Danwake.
STEP 8: After turning off the heat, scoop the Tubani one by one and place them in a clean warmer.
STEP 9: Fry your oil (vegetable or palm oil) for just 2 minutes.
STEP 10: Your Tubani with wake (beans) is ready!
How to Make Tubani Recipe with Masara (Maize)
Ingredients
Same with the ingredients for Tubani made from maize and soya beans
Procedure for Preparing Tubani with Masara (Maize)
The procedure is the same as that of Tubani made from Maize and soya beans except that in this case, no soya beans.
How to Serve TubaniRecipe
Tubani is usually served with Miyan Taushe, which is typically poured over the tubani. Powdered pepper, Maggi, and oil could be put on top of the Tubani before serving. Alternatively, you could simply place the Tubani on one plate and the oil, pepper, and maggi combined on another platter, and then consume the Tubani by dipping it in the second plate.
Occasions to Serve Tubani Recipe Best
Tubani is suitable for consumption at any time of the day. It could also be consumed as one of our three fundamental meals (breakfast, lunch, and dinner). When eaten as a dessert, it isn’t a bad idea.
How to Store TubaniRecipe
If you keep it submerged in water, it will last for 24 hours. When refrigerated, however, it will last 3 to 4 days.
Tubani recipe is a delicious northern Nigerian dish that is simple to cook, as you’ve seen above. You’ll get there if you properly follow the steps. I hope you found this article to be useful.
Anyway, that concludes this amazing meal. Make it for yourself or your family, and let us know how it goes in the comments area below.
Hanjin Ligidi is a delicacy or cuisine that is primarily consumed by children. It’s a popular cuisine in northern Nigeria, particularly among the Hausas.
I recall drinking a lot of this as a kid, along with Charbin Malam, Dan Tamatsitsi, and other similar beverages. I still find it fascinating and amazing when I eat it from time to time to reminisce about the good old days.
If you use this piece as a reference, it will be quite simple to prepare.
STEP 1: Spread the tamarind (tsamiya) on a big surface, such as a tray, and dust off the tsamiya’s surface.
STEP 2: Wash the tamarind (tsamiya) thoroughly in a clean water bowl and drain.
STEP 3: Fill the bowl with water once again to soak the tamarind for 30 minutes. You might use hot water to speed up the soaking process and attain your goal in as little as 5 minutes.
STEP 4: Place a clean pot over medium heat and sieve the soaked tamarind into the pot. Allow it to come to a boil.
STEP 5: Pour in the sugar, stirring constantly as you pour. Carry on like this until the mixture becomes very thick.
STEP 6: Finally, add your flavoring to the pot’s contents and stir well.
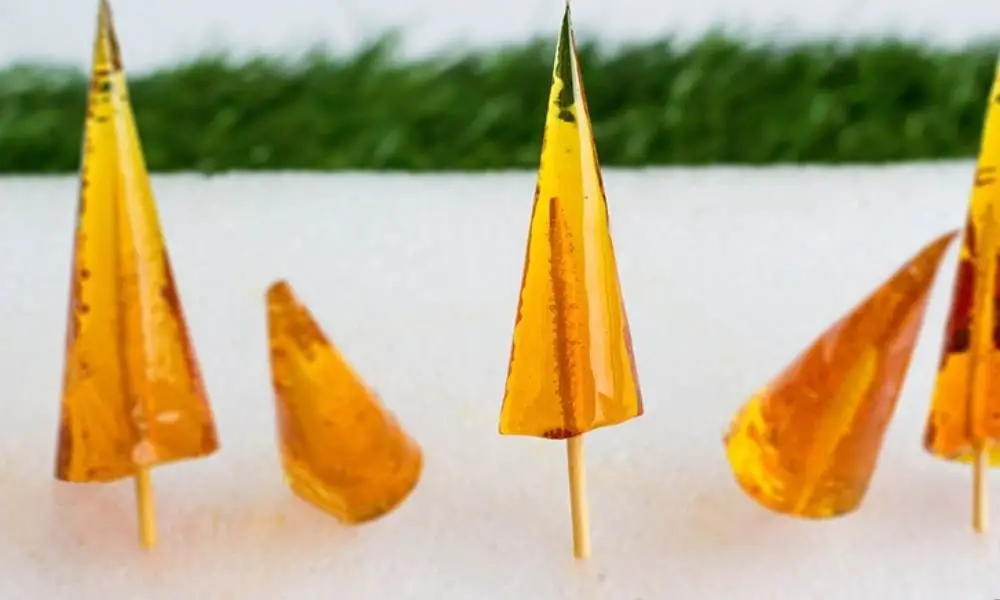
STEP 7: Remove the pan from the heat, pour the contents of STEP 6 into your funnel-shaped paper, and put a toothpick in it. Repeat this procedure till all Hanjin Ligidi have been used up.
STEP 8: Set aside 10 minutes to cool.
STEP 9: Your Hangin Ligidi is ready for consumption.
How to Serve Hanjin Ligidi
It is served the way snacks are served. To consume it, you will have to peel the paper off the Hanjin Ligidi, hold the toothpick with your thumb and index finger, and lick. Oh, my God, I’m salivating already.
Occasions to Serve Hanjin Ligidi Best
This recipe is suitable for consumption at any time of day. You know how kids are: they’ll eat anything at any moment.
How to Store Hanjin Ligidi
It can last for months without being refrigerated if kept in a secure location away from children and rodents.
Miyan Lalo recipe/Miyar Lalo also known as Jute Leave Soup or Ewedu Soup in English language is a delicacy specifically consumed in the Northern part of Nigeria and specifically among the Hausa ethnic groups. It is easy to make, tastes good when prepared well, and is enjoyed by a lot of people. This article seeks to teach you how to prepare Miyan Lalo (yadda ake Miyar Lalo)
What are we waiting for? Let’s get started with the ingredients needed to make this sumptuous soup first.
Ingredients
2 bunches of Lalo leaves (Jute leaves) Fresh pepper, onions, garlic, and ginger Meat Seasoning cubes and salt to taste A little potash (kanwa) 2 medium locust beans (daddawa) 3 cups of water 1 cup of palm oil (optional)
Procedure for Preparing Miyan Lalo
STEP 1: Grate or grind your fresh pepper and onions and set them aside.
STEP 2: Pound the locust bean (daddawa) into a fine powder and set it aside as well.
STEP 3: Wash your Lalo leaves properly and cut them into small pieces and set them aside as well.
STEP 4: Wash the meat and put them in a pot over medium heat. Add your grated onions, ginger, and garlic to it. Also, add your seasonings to it and add water. Cover the pot with its lid and allow 30 minutes of cooking time.
STEP 5: Add the grinded daddawa (powdered locust bean) and seasoning cubes with salt to taste too. Cover to cook for 25 minutes.
STEP 6: By now, your meat is well-cooked and soft, Good! Now add the Lalo leaves, then a little potash (kanwa), and a little palm oil (which is optional) to the cooking pot. Allow to simmer for 10 minutes.
STEP 7: Tada! Your Miyan Lalo is ready for consumption.
Miyan Lalo is best served hot with a glass of chilled water or your favourite beverage. Interestingly, you could even take it alone.
Occasions to Serve Miyan Lalo Best
It can be taken as any of the 3 basic daily meals (breakfast, lunch, and dinner) but preferably, lunch and dinner when it’s fresh. When it is the remnant of the previous day, you could take it as breakfast in form of dumame (double fire)
How to Store Miyan Lalo
When refrigerated with a constant power supply, it can last for days. However, in the absence of a refrigerator, you could warm it morning and evenings. Doing so will make it last a few more days compared to when refrigerated. To avoid all of these and for convenience, you could just make just enough for the present need.
Furthermore, it appears to contain larger levels of the above vitamins and minerals. This is due to the fact that a cooked cup of jute leaves contains almost three times the amount of leaves.
Conclusion
If you carefully follow the above procedures carefully, you should be able to arrive at the actual Miyar Lalo recipe you intend to have. As you have seen, it isn’t difficult at all. All you need to do is make up your mind and try it. When you do, share with us your experience in the comments section.
If you find this article helpful, please leave a comment in the comments section below as well.
Kwadon Kanzo is yet another Northern Nigerian delicacy consumed primarily by the Hausas and Fulanis. The recipe is enjoyed by many, young and old, poor, average, and even some wealthy families. This article seeks to teach you how to prepare the Kwadon Kanzo recipe. Stay with me. But first, what is this ‘Kanzo’?
Kanzo is a burnt part of the Tuwo (that of shinkafa, masara, dawa, alkama, and the like) meal. It is obtained by allowing the bottom of the pot to cook until it forms a dry crust called Kanzo.
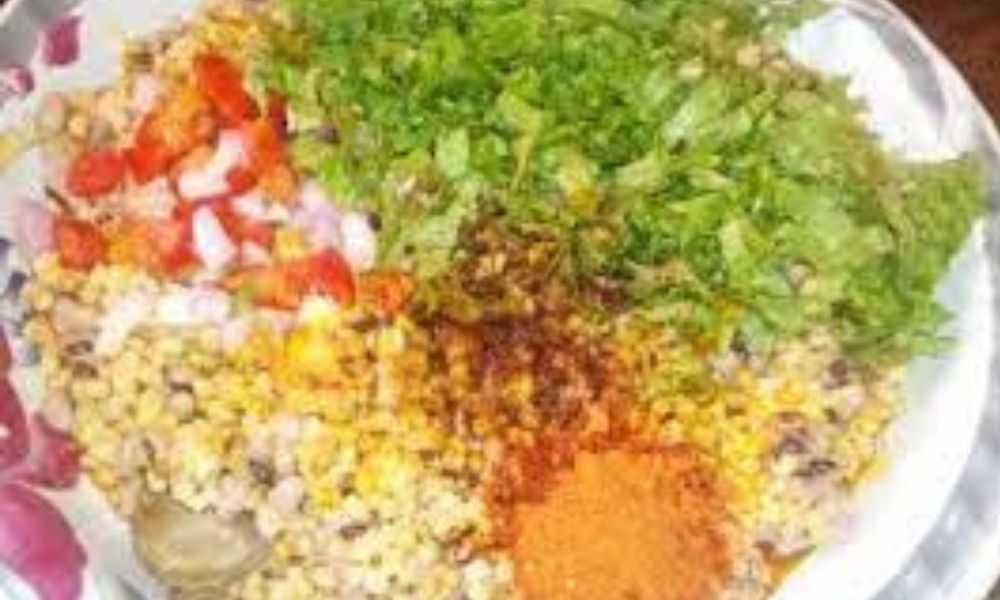
5 cups of Kanzo (burnt part of Tuwo) Tomatoes, peppers, and onions. 1½ cups of groundnut cake (Kuli-Kuli) Seasonings and salt to taste ¼ cup of fried vegetable oil Cucumber (optional)
Procedure for Preparing Kwadon Kanzo Recipe
STEP 1: Get a clean mortar (turmi) and pestle (tabarya), put the kanzo, and grind it into small pieces. Then;
STEP 2: Put it in a clean bowl and add water to it. Allow soaking for 5 to 10 minutes, depending on how hard the kanzo or crust is.
STEP 3: Strain the Kanzo in a strainer (matsami or rariya) to drain off the water completely. Then;
STEP 4: Grind the Kuli-Kuli (groundnut cake), cut the tomatoes, cucumber (optional), and pepper, and set them aside.
STEP 5: Now, in a mixing bowl, add the content in STEP 4, fried groundnut oil, seasonings, and a pinch of salt. Then;
STEP 6: Mix the content in STEP 5 well until properly combined.
STEP 7: Ladies and gentlemen, your Kwadon Kanzo is ready!
How to Serve Kwadon Kanzo Recipe
Serve it with properly cut or sliced vegetables to make it look very appetizing. You could also add cabbage to the above-listed ingredients if you so wish, to make it taste even better.
Occasions to Serve Kwadon Kanzo Best
It is best consumed as any of the basic meals or as a dessert. This makes it good for consumption at any time. However, it is not advised that you make it for festivals, ceremonies, or the like.
How to Store Kwadon Kanzo Recipe
This delicacy cannot be stored for more than 24 hours. 24 hours could even be too much time. You could try storing it in a refrigerator, but be assured that it won’t taste as good as you would have wanted it.
As a result, it is best to prepare the quantity just enough for consumption at a certain time. If you need more, you could always prepare another one. After all, it is very easy to make.
Nutritional Value of Kwadon Kanzo
We, as humans, need the energy to take care of our daily struggles. As such, we need this northern Nigerian cuisine as it contains a great deal of carbohydrates. This is because all of the vitamins that form the Kanzo used in this delicacy are carbohydrates.
Conclusion
As we have seen above, the Kwadon Kanzo recipe is very easy to make and tastes delicious when properly prepared. You could try it someday for yourself or your family. However, don’t forget to share your experience with us when you do.
If you find this article helpful, please leave a comment in the comments section below as well.