Some combinations of foods are just amazing and will make you wonder, ‘Who first thought of preparing this food?’ Dawa da Wake is a northern Nigerian recipe mostly consumed by the Hausas. It is a combination of guinea corn (dawa) and beans (wake) to produce a finger-linking, sumptuous meal that will make you crave more after you first taste it. In this article, I will be teaching you how to make Dawa da Wake (yadda ake Dawa da Wake).
The following ingredients are needed when preparing Dawa da Wake:
Dawa (guinea corn) Wake (beans) Palm oil Kuli Kuli (groundnut cake) Water Salt, Maggi, cabbage, spinach, onions, and tomatoes
Procedure for Preparing Dawa da Wake
STEP 1: Get a big mortar and pestle, pour the guinea corn seeds into it, sprinkle a little water on it, and then pound for like 30 minutes. This is called surfe in the Hausa language.
STEP 2: Pour the pounded guinea corn (dawa) into a large tray and try separating the seeds from the shaft. This is called bakace in Hausa.
STEP 3: Wash the guinea corn very well and drain it, then set it aside.
STEP 4: Over medium heat, put a clean pot, add your beans to it, and allow 10 minutes of cooking time. Then;
STEP 5: Pour the guinea corn and allow to cook for 40 minutes together with the beans
STEP 6: Turn off the heat, pour in a warmer, and set it aside. Then;
STEP 7: Slice your onions, tomatoes, and spinach and set them aside.
STEP 8: Get a clean mortar and pestle and pound the groundnut cake (Kuli-Kuli) until it is slightly coarse in texture. Then;
STEP 9: Get a frying pan over medium heat and fry the contents in STEP 7 for 5 minutes.
STEP 10: Ta-da! Your Dawa da Wake is ready for consumption.
How to Serve Dawa da Wake
Dawa da Wake is best served hot with a chilled drink of your choice.
Occasions to Serve Dawa da Wake Best
Dawa da Wake is mostly consumed or eaten as a basic meal (lunch, breakfast, or dinner). It is hardly served on grand occasions like weddings, birthday parties, festivals, etc.
How to Store Dawa da Wake
It can last for many months without refrigerating as long as it is kept in a safe place away from children and rodents.
Dawa da Wake is easy to make. The only stressful part is removing the shaft of the guinea corn seeds (i.e., the surfe part). We all know that pounding is not easy, and this one takes minutes to achieve the desired result, depending on the quantity you intend to have.
You could just prepare this meal in jollof form.
I’m optimistic that this piece was worthwhile for you.
Anyway, that’s a wrap for this delicious meal. Now that you know how to make Dawa da Wake (yadda ake Dawa da Wake), why don’t you try making it for yourself or your family and tell us your experience in the comments section below?
Hanjin Ligidi is a delicacy or cuisine that is primarily consumed by children. It’s a popular cuisine in northern Nigeria, particularly among the Hausas.
I recall drinking a lot of this as a kid, along with Charbin Malam, Dan Tamatsitsi, and other similar beverages. I still find it fascinating and amazing when I eat it from time to time to reminisce about the good old days.
If you use this piece as a reference, it will be quite simple to prepare.
STEP 1: Spread the tamarind (tsamiya) on a big surface, such as a tray, and dust off the tsamiya’s surface.
STEP 2: Wash the tamarind (tsamiya) thoroughly in a clean water bowl and drain.
STEP 3: Fill the bowl with water once again to soak the tamarind for 30 minutes. You might use hot water to speed up the soaking process and attain your goal in as little as 5 minutes.
STEP 4: Place a clean pot over medium heat and sieve the soaked tamarind into the pot. Allow it to come to a boil.
STEP 5: Pour in the sugar, stirring constantly as you pour. Carry on like this until the mixture becomes very thick.
STEP 6: Finally, add your flavoring to the pot’s contents and stir well.
STEP 7: Remove the pan from the heat, pour the contents of STEP 6 into your funnel-shaped paper, and put a toothpick in it. Repeat this procedure till all Hanjin Ligidi have been used up.
STEP 8: Set aside 10 minutes to cool.
STEP 9: Your Hangin Ligidi is ready for consumption.
How to Serve Hanjin Ligidi
It is served the way snacks are served. To consume it, you will have to peel the paper off the Hanjin Ligidi, hold the toothpick with your thumb and index finger, and lick. Oh, my God, I’m salivating already.
Occasions to Serve Hanjin Ligidi Best
This recipe is suitable for consumption at any time of day. You know how kids are: they’ll eat anything at any moment.
How to Store Hanjin Ligidi
It can last for months without being refrigerated if kept in a secure location away from children and rodents.
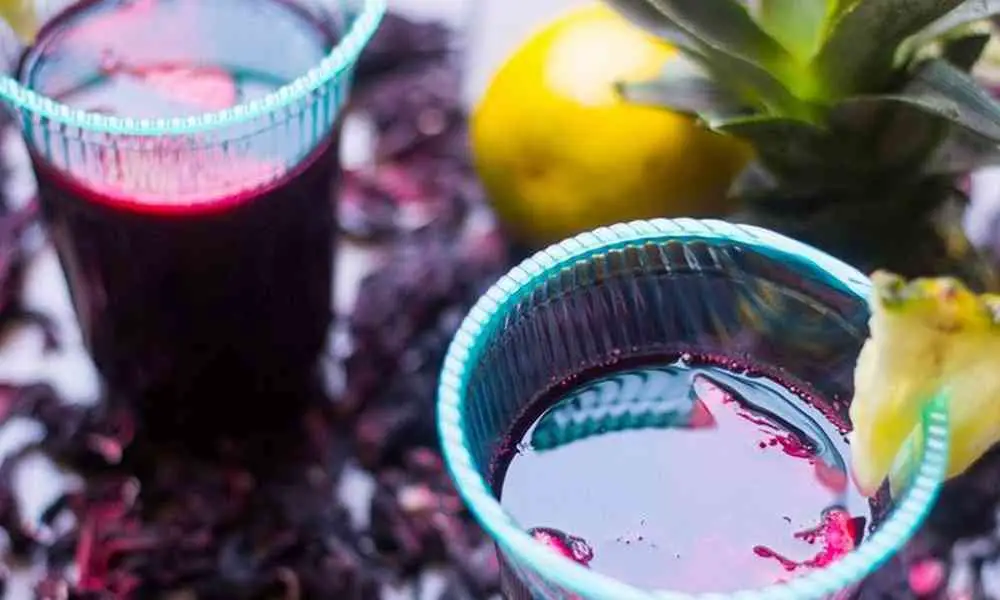
The Zobo Drink recipe is a drink well consumed in all parts of Nigeria. It is made of Roselle or hibiscus leaves. It makes a great occasion drink. In addition, it offers a lot of health benefits, which makes it one of the healthiest drinks. In this article, I will be teaching you how to prepare your delicious drink so that after tasting it, it will keep you wanting to make more and more of it.
The following ingredients are needed when preparing Zobo Drink:
4 cups of dry zobo leaves
2 spoons of ground ginger
1 tablespoon of cloves (kaninfari)
2 slices of pineapples
7 litres of water
6 small pieces of potash (kanwa) or baking powder.
Sugar
Flavor
Foster Clarks, Nutri C, and Jolly Juice (optional)
Cucumber
Procedure for Preparing Zobo Drink
STEP 1: Pour the zobo leaves into a clean tray and remove dirt and stones.
STEP 2: Pour the leaves into a clean bowl and add some clean water. Then;
STEP 3: Rinse out the dust from the zobo leaves with clean water. When well rinsed, pour into a clean pot.
STEP 4: Over medium heat, place the pot and allow it to boil. Add potash or baking powder.
STEP 5: Wash and cut the pineapples into thin slices and add them to the pot. Allow it to continue boiling for at least 30 minutes.
STEP 6: When the zobo leaves are completely soft, turn off the heat and set them aside to cool for more than 20 minutes.
STEP 7: Stir the zobo leaves, and then pour the zobo into a cheesecloth to remove the leaves and tiny particles. You will have a red-like liquid in the clean bowl. Then;
STEP 8: Add water to the quantity you want.
STEP 9: Also, add the ground ginger and your kanamfari (cloves), sugar, and flavor. Stir very well until the sugar completely dissolves.
STEP 10: You could also add Foster Clark, Jolly Juice, and/or Nutri-C.
STEP 11: Slice your cucumber into small particles and set it aside. Then;
STEP 12: Pour the drinks into bottles and add slices of cucumber to each of them.
STEP 13: Your Zobo drink is ready!
How to Serve Zobo Drink
The Zobo drink recipe is served chilled. You could serve it alone or with Cincin, Fanke (puff-puff), Doughnut, Fankasau, or any snack of your choice. In addition, it can also go with solid foods like Tuwon Shinkafa, Moi Moi, Danwake, etc.
Occasions to Serve Zobo Drink Best
This drink can be served on any occasion, as long as it is well packaged. You could take it together with your breakfast, lunch, or dinner meals. It is also a good dessert.
How to Store Zobo Drink
The most logical advice is to keep this drink in the freezer—not just in the refrigerator, but in the coldest part of it. Store it there for as long as you want.
Zobo drinks recipes, if not properly stored, spoil easily. It lasts for just 24 hours at its best quality.
To the best of my knowledge, this is the most commonly consumed drink in Nigeria. We often pay money to buy them to take. Since it is something that we consume often, why don’t learn how to make it ourselves?
Try it and tell me your experience in the comments section below.
This recipe is one of the local northern Nigerian delicacies that are almost going extinct. Why? Well, it is hard to say, but one thing I know for sure is that it isn’t because of its taste. No. It looks very fine when well prepared. Its major ingredient is coarse maize flour (Tsakin Masara). Shashshaka also refers to Dan Malele – don’t get confused.
STEP 1: Pour clean water into a pot over medium heat and allow it to boil.
STEP 2: Wash the tsaki properly, remove dirt, stones, and chaff (dussa), and set it aside. Then;
STEP 3: Pour the tsaki into the boiling water and stir it gradually to avoid lumps.
STEP 4: When it starts getting thick, leave it to cook for 30 minutes. Then;
STEP 5: Switch off the heat and take it down.
STEP 6: Get a tray and pour the shashshaka on it. Then;
STEP 7: Allow it to cool for more than 10 minutes.
STEP 8: Get a clean knife and cut it into your desired sizes and shapes. Then;
STEP 9: Over medium heat, put a frying pan and add a little palm oil to it. Slice your onions and add them to the frying pan. Allow frying for 5 minutes.
STEP 10: Remove it from the frying pan, put it on a plate, and add fried palm oil on top of the shashshaka. Add powdered pepper too. Repeat the same process until the pieces of shashshaka are exhausted.
STEP 11: Finally, your Shashshaka is ready for consumption.
How to Serve Shashshaka
The Shashshaka recipe is mostly served with palm oil, powdered pepper, and sliced onions. You could also cut fresh pepper and tomatoes and add them to it; it gets more delicious.
Traditionally, it is normally served on big trays.
Occasions to Serve Shashshaka Best
This is a recipe usually served as breakfast, lunch, or dinner. You could also eat it as an appetizer. However, you do not want to be embarrassed by making it for ceremonies like weddings, festivals, etc.
How to Store Shashshaka
Shashshaka recipe is stored in a cool place and can last for a day or two.
Nutritional Value of Shashshaka
As maize is an energy-giving food, shashshaka serves as an energy-giving food as it provides us with the energy we need for our day-to-day activities.
Conclusion
As delicious as the recipe is, I wonder why it is consumed less and less by the day. Shashshaka is mostly consumed by the poor or average Nigerians, but hey, who says the wealthy can’t have a taste of its sumptuousness?
Try it and tell me about your experience in the comments section below.
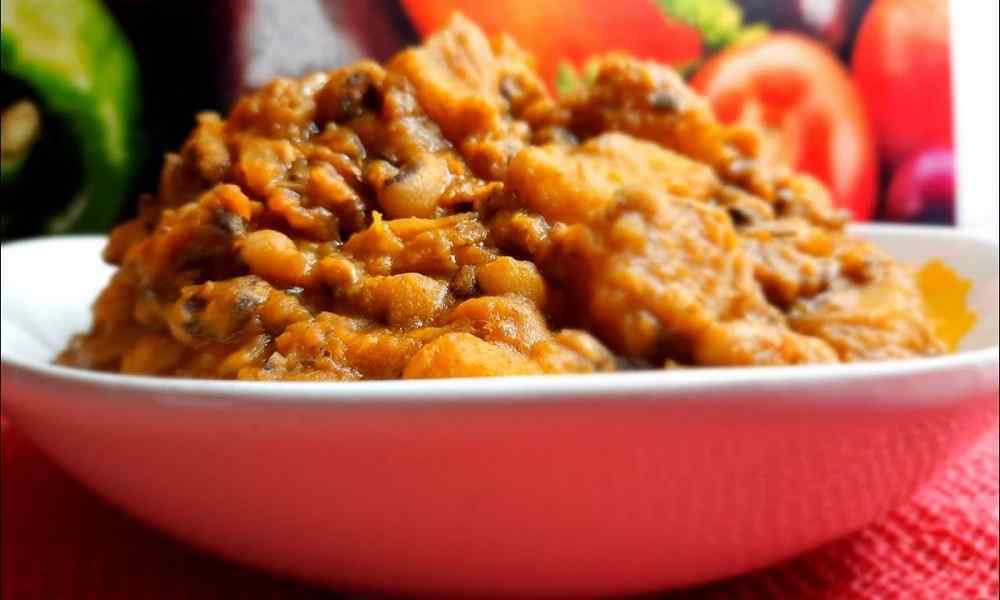
Faten Wake, otherwise known as Beans Porridge in the English language, is a food consumed basically by almost all tribes in Nigeria. I seriously don’t know any tribe that doesn’t. To be more specific, the Yorubas are the major consumers of this type of recipe. This article seeks to walk you through how to prepare bean porridge (faten wake).
The primary ingredient for this delicacy is beans. Of course, it has to be because the name of the recipe implies that.
What are we waiting for? Let’s get started on how to prepare bean porridge!
2 cups of beans Spices (maggi, curry powder, etc.) Vegetables like pepper, onions, tomatoes, etc. A small bunch of spinach (optional) ½ cup of vegetable or palm oil Boiled or fried meat or fish (optional) Salt to taste
Procedure for Making Faten Wake
STEP 1: Pick the dirt out of the beans
STEP 2: Wash the beans well. Then;
STEP 3: Over medium heat, put the washed beans in a pot and allow them to cook. Do this for 30 minutes. If you wish, you could add kanwa (potash) to it to speed up the process.
STEP 4: By now, the beans are soft. Wash the beans well with clean water and put them in a bowl. Set this aside.
STEP 5: Put a clean pot over medium and pour in your vegetable or palm oil.
STEP 6: Slice your onions, tomatoes, and pepper and put them into the pot in STEP 5. Allow to fry for 10 minutes. Ensure you stir gently from time to time to avoid sticking to the bottom of the pot.
STEP 7: Now, add a little water to the pot and pour in your meat or fish. Remember, adding meat or fish is optional. Allow it to boil for 5 minutes.
STEP 8: Add your boiled beans to the pot and stir gently. Leave to cook for another five minutes.
STEP 9: Now slice your spinach and wash thoroughly before you add it to the pot. Allow to simmer.
STEP 10: Add in your salt, Maggi, and other spices like curry powder. Allow it to cook for 5 minutes too.
STEP 11: Taste the meal and add spices if need be. Turn off the cooker, and your Faten Wake is done.
How to Serve Faten Wake
Faten Wake recipe is served with soaked or raw garri (soak the garri and eat with the beans or pour the raw garri on the recipe and stir, then eat), bread, water, etc. You could also eat it with fried plantains, fried chips, boiled or fried eggs, and lots more.
Don’t forget to serve it hot, as it tastes better when hot.
Occasions to Serve Faten Wake
Faten Wake can be eaten as breakfast, lunch, or dinner. Yorubas even serve it at naming ceremonies, weddings, festivals, etc. Basically, Faten Wake is for all occasions.
How to Store Faten Wake
Beans have a high tendency to spoil; as a result, ensure you make just enough for immediate consumption. However, if it is more than enough, you can store it in a refrigerator, and that will make it last for days to the detriment of its delicious taste.
In addition, people who consume beans on a regular basis are less likely to die of heart attacks or other cardiovascular illnesses. It also helps in reducing the risk of cancer, stabilizing blood glucose or even preventing diabetes, preventing fatty liver, and lots more.
Conclusion
As you have seen, how to prepare Beans Porridge (Faten Wake) is like a walk in the park if you follow the above-mentioned steps. If this recipe is new to you, I hope you try making it soon so as not to miss out on its amazing taste.
If you find this article helpful, please leave a comment in the comments section below.