
by Fatima Sani | Jan 16, 2022 | Local Delicacies
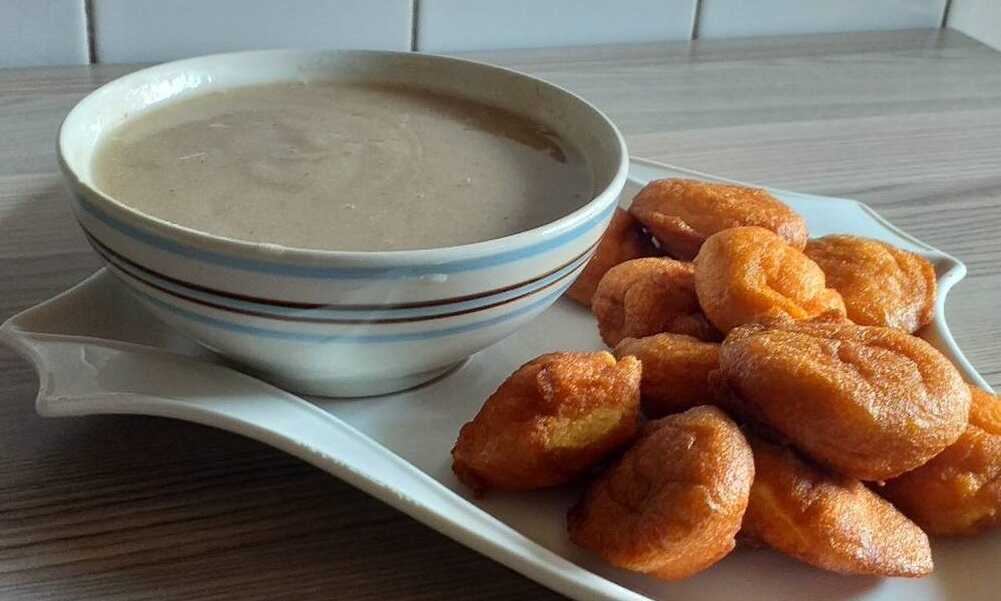
Fankasau recipe is a traditional snack that originated from the northern part of Nigeria – mostly among the Hausas. Its basic ingredient is flour and it is very easy to make and tastes delicious.
Let’s not waste any time and get right into how it is been prepared.
Equipment for Making Funkasau
Frying pan
Bowl
Sieve
Tray
Container
Slotted spoon
Fankasau Recipe
Ingredients
To make this delicacy, you will need the following ingredients:
3 cups of wheat flour
1 spoon of yeast
1 teaspoon of kanwa (potash)
Water
1 teaspoon of salt
Vegetable oil
Fankasau Recipe
STEP 1: Wash your wheat properly and remove stones from the grains. Spread it under the sun to dry then take it to the grinders to grind it for you.
STEP 2: After grinding, allow it to cool for 10 minutes.
STEP 3: Sieve the powdered wheat and set it aside. Then;
STEP 4: Soak the yeast with water and add some potash (kanwa) and mix.
STEP 5: Add a little salt inside the powdered wheat, pour water, and make a thick paste. Ensure it’s not too thick though.
STEP 6: Cover the paste and keep it in a warm place to rise for an hour.
STEP 7: Rub oil in your palm and mix it again. Then;
STEP 8: Rub oil at the back of a tray. Then place a little of the Fankasau mixture on it.
STEP 9: Get a little vegetable oil in a small container. Dip your hand in it and make a hole in the middle of the Fankasau mixture.
STEP 10: Over medium heat, place a frying pan and add 2 cups of vegetable oil and slice some onions in it and allow to fry.
STEP 11: When the onion slices are fried, add the Fankasau gently into the hot oil and allow to fry for 15 minutes. Then;
STEP 12: Use a slotted spoon to get the friend Fankasau into a sieve container. The sieve is to drain the oil on the surface of the Fankasau.
STEP 13: Scoop the fried pieces of Fankasau onto a flat and try to dry and cool down quickly.
STEP 14: Ta-da! Your Fankasau is ready.
How to Serve Fankasau
Traditionally, Fankasau recipe is mostly served with Miyan Taushe. Some prefer to take it with sugar by dipping it into a container containing sugar and then eating it. Personally, my preference is Miyan Taushe. Ensure to serve hot as it tastes best.
Occasions to Serve Fankasau
This recipe is served on various occasions including eids, weddings, naming ceremonies, or any festival.
How to Store Fankasau
It is advisable to store this delicacy in a cool dry place because it lasts longer – say 10 days. To avoid spoilage or wastage, you could just make it in small quantities for immediate consumption.
Alternatively, you could store it in a refrigerator but its taste will definitely diminish the longer it stays refrigerated.
Nutritional Value of Fankasau
Because of the wheat grain in this recipe, helps in controlling obesity, improving body metabolism, prevention of type 2 diabetes, reducing body inflammation, prevention of breast cancer, and so on.
Conclusion
Now that you know how to prepare Fankasau, it would be nice if you try making it. When you do, could you please share with us your experience here?
If you find this article helpful, please leave a comment in the comments section below.
You are always welcome to Northpad Nigeria for more local Northern Nigerian delicacies.
by Fatima Sani | Jan 8, 2022 | Local Delicacies
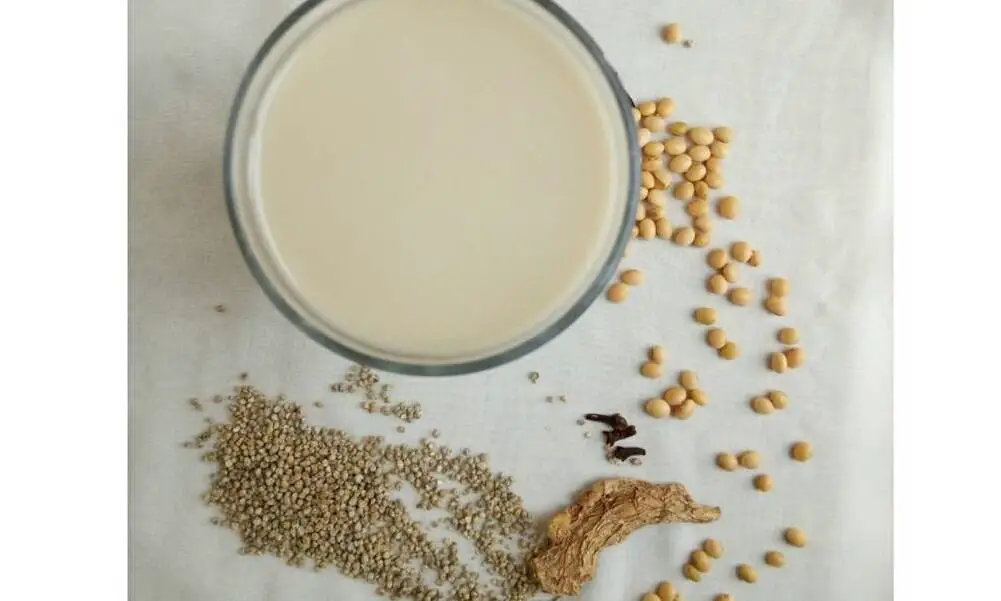
Kunun Tsamiya recipe is a northern Nigerian delicacy that is mainly made from powdered millet and tamarind (tsamiya) – that is where the name even came from. It is a very common drink among the Hausas especially for nursing mothers as it is believed that it helps increase breast milk.
Without any delay, let’s get into how it is been prepared. Allow me to be your guide
Equipment for Making Kunun Tsamiya.
Sieve
Bowl
Cheesecloth
Cooking pot
Scoop
Ingredients
2 cups of powdered millet.
Tamarind in the quantity desired.
Spices (dried pepper, ginger, cloves.
Sugar
Water
Procedure for Preparing Kunun Tsamiya
STEP 1: Wash the millet and soak it for 6 hours. You could soak it overnight if you intend to make it in the morning.
STEP 2: By now, the millet grains are soft. Wash again with clean water and add your spices – dried pepper, ginger, and cloves.
STEP 3: Take it to grinders to grind it for you. After grinding, leave it to cool for 10 minutes.
STEP 4: Add more water to the ground millet to enable you to sieve it well and set it aside.
STEP 5: Over medium heat, place a clean pot and add water and tamarind into the pot. Allow it to boil. Alternatively, you could soak it for 30 minutes if you have enough time to spare.
STEP 6: Pour the powdered millet into a clean bowl and add some water. Stir it very well with a spoon of your choice.
STEP 7: When STEP 5 has reached boiling point, take it down and pour the boiling water into the mixed millet powder.
STEP 8: After that, start stirring it gently. But when it gets too thick for your liking, you can still add some water.
STEP 9: Add sugar to your taste to the Kunun Tsamiya and you are done!
As easy as that!
How to Serve Kunun Tsamiya
You can take Kunun Tsamiya recipe with Akara (Beans Cake), Kuli-Kuli (Groundnut Cake), Cincin, or any snack of your choice. It will interest you to know that you could just take this recipe alone without anything to go with it – it tastes just fine.
Occasions to Serve Kunun Tsamiya
To the best of my knowledge, there are no special occasions for the consumption of this pap recipe. This means that it can be consumed anywhere and anytime. Well, as I said earlier, it is advisable for breastfeeding mothers to take it as it is said to increase breast milk flow.
How to Store Kunun Tsamiya
Kunun Tsamiya recipe in its best quality does not last for more than 24 hours. In addition, it cannot be stored in a refrigerator. On that note, I suggested you make just enough for present consumption.
Nutritional Value of Kunun Tsamiya
Kunun Tsamiya’s health benefits cannot be overemphasized as it helps in heart health, diabetes management, and helps prevent asthmatic symptoms because of the millet in it.
Because of the Tamarind in it, it helps boost the immune system, improves digestion, improves blood circulation, aids weight loss, fights cancer and rapid aging among others.
Conclusion
As you have seen, this recipe is easy to make but for its taste, you will need to prepare it to feel it firsthand. So tell me, when do you intend to make it? For a change, try and make this for breakfast for yourself or your family.
If you find this article helpful, please leave a comment in the comments section below. Thank you.
You are always welcome to Northpad Nigeria for more local Northern Nigerian delicacies.
by Fatima Sani | Dec 18, 2021 | Local Delicacies
Today, I have come with another northern Nigerian drink for you – Kunun Zaki; Kunu means ‘pap’ the letter ‘n’ is added at the end of the word to show possession; and Zaki meaning ‘sweet’, together we have Kunun Zaki literarily translated as ‘pap for sweet’. Absurd right? Of course yes, but not its sweetness. In this article, I will be sharing with you my expertise in the preparation of Kunun Zaki. Stay with me.
It is worth noting that Southern Kaduna usually called Chongais and called by Hausas ‘Katafawa’ are best known for the making of this recipe. If you have tasted theirs, you will attest to this fact. Anyways, without making you wait for long, let’s quickly get into business!
Equipment for Making Kunun Zaki
2 bowls
Blender
Cooking pot
Cheesecloth
Ingredients
You will need the following ingredients to make Kunun Zaki
3 cups of millet
Sugar to taste
2 liters of water
Spices (dried ginger, dried pepper, and cloves (kaninfari).
Now that you know the ingredients, let’s dive into its preparation:
Procedure for Preparing Kunun Zaki
STEP 1: Pick up dirt from the millet.
STEP 2: Pour the millet into a bowl or a container and wash it with water thoroughly and drain the water. Then;
STEP 3: Pour in another fresh water and allow to soak for 6 hours. If you wish to prepare this drink in the morning, you could soak it overnight. That will do just fine.
STEP 4: By now, the millet is a bit softer than its original state. Now wash the millet again and drain the water.
STEP 5: Add ginger, pepper, and cloves (kaninfari)
STEP 6: Advisably, grind it using a blender if it is in small quantity. However, for large quantities, grind it using a grinding machine (injin nika) in the Hausa language. Grind it until it turns to paste.
STEP 7: Separate the pastes into two different bowls and add a little water to both of them.
STEP 8: Over medium heat, place a clean pot and add water to it. Allow to boil.
STEP 9: Pour the hot water into the first bowl and stir it immediately (this is to avoid forming lumps) until it is thick as if you are preparing pap.
STEP 10: Cover it well and allow cooling. After cooling, add the bowl containing the second paste into it and stir it.
STEP 11: Pour it into a cheesecloth and sieve it. Then;
STEP 12: Add cold water and sugar to your taste.
STEP 1: Ta-da! Your Kunun Zaki is ready!
How to Serve Kunun Zaki
Kunun Zaki is poured into jugs and served in cups. You could take it with Cincin, Fankasau, Dublan, or Buns, some even take it with bread. Because of its cheapness also, unskilled labourers love to take it together with bread to save money.
Occasions to Serve Kunun Zaki
Well, Hausas usually don’t use this drink for occasions or festivals. However, Southern Kaduna serves this in almost all of their occasions, gatherings, festivals, etc.
How to Store Kunun Zaki
Advisably, make this recipe in the quantity you can consume now as it does not last for more than 24 hours unrefrigerated. Regardless, the moment its taste changes to sour, discard it.
On the contrary, it can last for a few days if refrigerated, but its sweetness is greatly altered.
Nutritional Value of Kunun Zaki
Kunun Zaki has the potential to improve the digestive system, protect the heart, improve respiratory health, manage diabetes, and detoxify the body as millet is the major constituent. It also contains a good mix of vitamins and minerals, including calcium, vitamin A (beta-carotene), iron, and potassium because of the cloves (kaninfari in it).
For more health benefits of Kunun Zaki, visit Health Guide Nigeria.
Conclusion
Now that you know how to make Kunun Zaki (Millet Gruel), you should try making it for your consumption or your family. As a Hausa person, you could try serving it on that occasion of yours that is coming soon or a festival for a change. People like positive changes you know, so surprise them.
If you find this article helpful, please leave a comment in the comments section below. Thank you.
You are always welcome to Northpad Nigeria for more local Northern Nigerian delicacies.

by Fatima Sani | Dec 18, 2021 | Local Delicacies
Cincin recipe otherwise spelled as ‘chin chin’ is a popular snack among Nigerians. It is consumed by almost all tribes and ethnic groups. They are common recipes for weddings, birthdays, festivals, etc. Its common ingredient is flour. In addition, it is a delicious snack, easy to make, and mostly loved by all children.
Do you have a wedding ceremony, eid, or festival and you find it difficult to come up with a snack to consume or use as a takeaway delicacy? Worry no more as I have come to your aid.
Equipment for making Cincin
Mixing bowl
Frying pan
Sieve
Scissors
Knife
Container
Ingredients
For the making of Cincin, you will need to follow the ingredients:
4 cups of flour.
1 cup of powdered milk
2 teaspoons of powdered vanilla flavor
Half a teaspoon of ground nutmeg
Small pinch of salt
3 eggs
Half a teaspoon of baking powder
Vegetable oil
1 butter
Water
Procedure for Making Cincin
STEP 1: The first thing to do is, crack the eggs in a small bowl and add a pinch of salt. Whisk together and set aside.
STEP 2: Put the sugar into a bowl, add the milk and mix.
STEP 3: In a clean bowl, sieve the flour, add baking powder and nutmeg to the bowl, and mix well. Then;
STEP 4: Add the butter to the flour and mix it very well too.
STEP 5: Add the mixture in STEP 2 and STEP 1 to the flour and mix it very well with your clean hands until a smooth dough is formed. Then;
STEP 6: Place the dough on a flat surface spread it with flour and start stretching the dough gently. However, ensure the dough isn’t too long or too thick.
STEP 7: When the dough is somewhat flat enough, use a knife and cut it into desired shapes and sizes. You could also use a scissor to do the cutting. Here, you will hold the dough with one hand and use the scissors to cut it with the other hand. For me, it is quite faster than using a knife.
STEP 8: Place a clean frying pan on medium heat, add your vegetable oil into the pan, and slice some onions into it too. Allow to fry for 3 minutes.
STEP 9: Add the cincin pieces to the hot oil and fry until it turns golden brown. Then;
STEP 10: Use a spoon to get out the fried cincin into a sieve container and allow them to cool.
STEP 11: Aaaaand your cincin is ready!
How to Serve Cincin
Cincin is usually served on plates. They can be consumed alone or with drinks. These drinks could be Kunun Zaki, Kunun Aya, carbonated drinks (though not good for your health), or other local drinks that we have.
Occasions to Serve Cincin
There are numerous occasions to best serve this delicacy or snack. It could be served in wedding ceremonies, during Sallah or Christmas periods, or during festive periods. Etc. In addition, it can be consumed anywhere, anytime.
Furthermore, they can be a part of the delicacies or snacks packed as souvenirs for guests during wedding ceremonies. In a Hausa family, Cincin is usually given to the bride among other snacks as she is taken to her husband’s house. This is to serve guests or visitors coming to wish the family well. Pretty much useful right?
How to Store Cincin
Cincin should be stored in a cool dry place. One good thing about its features or qualities is that it can last for several weeks without spoiling. Ensure to store it in the right container though.
Nutritional Value of Cincin
The Cincin recipe is majorly composed of carbs but also has moderate amounts of protein. Here are the nutrition facts for 3.5 ounces which is equivalent to 100 grams of whole-grain wheat flour: calories (340), water (11%), protein (13.2grams), sugar (0.4 grams) carbs (72 grams), fibre (10.7 grams), and fat (2.5 grams).
In addition, the consumption of Cincin has many health benefits which make it an interesting delicacy.
Conclusion
Conclusively, it is important to note that when you put too much egg in cincin recipe, it sucks up the vegetable oil, and too much vegetable oil in the human body is not healthy. However, additional eggs make it softer and not too crunchy.
If you find this article helpful, please leave a comment in the comments section below. Thank you.
You are always welcome to Northpad Nigeria for more local Northern Nigerian delicacies.
by Fatima Sani | Dec 11, 2021 | Local Delicacies
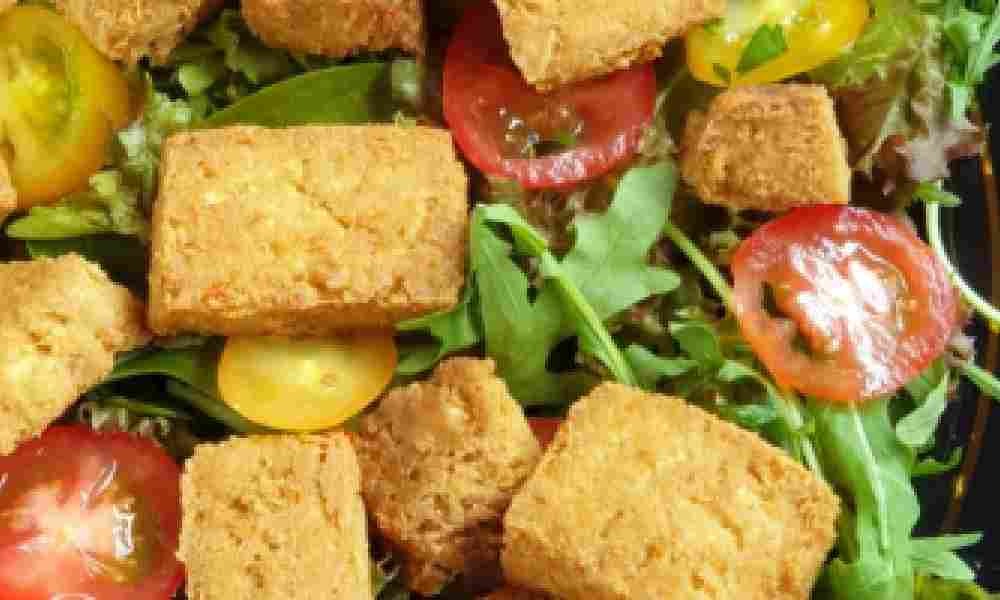
We have yet another delicious delicacy for you. It’s a local snack mainly consumed in the northern part of Nigeria – Awara also known as Wara in Hausa and Soya Beans Cake or Tofu in English. Its main ingredient as the English name implies is Soy Beans. There are different ways of making it depending on one’s financial capacity. However, this article seeks to give you the general way in which it is made. Stay with me.
Because of how much people love it in northern Nigeria, it can be found in restaurants or eateries. Also, people – mostly females are found frying and selling it on almost every street in residential areas occupied by average or less privileged Nigerians.
Without wasting your time, let’s get started with its preparation.
Equipment for Making Awara
Cooking pot
Kitchen knife
Bowl
Frying pan
Slotted spoon
Cheesecloth
Ingredients
To make this delicacy, you will need the following ingredients to make Awara:
3 cups of soya beans
3 cups of lime juice or pap juice
Pepper and onions (grated)
Palm and vegetable oil
Seasoning cubes
Grated garlic
Water
Salt to taste
Procedure for Preparing Awara
STEP 1: Pick dirt and stones from the beans properly, wash them and soak it for 12 hours. If you intend to make it in the morning, you could soak it overnight.
STEP 2: Grind the soaked beans using a grinding machine or a blender and little water as you grind.
STEP 3: Pour the grinded beans into a cheesecloth to extract the milk. Keep the milk aside. Then add 2 spoons of palm oil to the extracted milk.
STEP 4: Over medium heat, place a clean pot containing the extracted milk. Allow the content to boil for 15 minutes.
STEP 5: Begin to add the lime juice or pap juice little by little. The beans’ milk automatically starts to curd on its own from the water. Allow to keep boiling for additional 25 minutes.
STEP 6: After that, pour the cud into a bowl and allow it to cool for 5 minutes.
STEP 7: Add the grinded pepper, onions, seasoning cubes, salt, and grinded garlic. Then;
STEP 8: Pour it into a cheesecloth and tie it very well so that it is well-drained. Also, remember to put a heavy object on it for about 10 minutes. This aids proper draining.
STEP 9: After draining, bring it out from the cheesecloth and cut it into desired sizes and shapes.
STEP 10: Get your frying over medium heat. Add a little vegetable oil to it, slice your onions, and put them inside. Allow to fry for 4 minutes.
STEP 11: Now you can start frying. Fry your sliced raw beans cake and sear on each side until it turns golden brown.
STEP 12: Your Awara (Soya Beans Cake) is done and ready to be eaten.
How to Serve Awara
Awara is usually served with vegetable oil, grinded pepper. Nowadays, there is more garnishing to it. Sliced fresh pepper with cabbage and cucumber are added to it. In addition, it can be taken with Pap or Kunu.
Don’t forget to serve it hot as it tastes better when hot.
Occasions to Serve Awara
There is no specific occasion for this northern Nigerian snack. Therefore, it can be consumed anytime – for breakfast with Kunu or Pap or as brunch or as dessert – your choice.
How to Store Awara
This snack doesn’t last for long. It is best consumed not later than 24 hours. So I advise you to make it just enough for present consumption.
Nevertheless, you can store it in a refrigerator and it can last for a few days but of course, the delicious taste reduces significantly.
Nutritional Value of Awara
Because of the soya beans in it, it is very rich in nutritive components. Besides the very high protein content, Awara contains a lot of fiber and is rich in magnesium and calcium. Also, its protein contains a high biological value and contains all the essential amino acids. Again, Awara is rich in unsaturated fatty acids and low in saturated fatty acids which need to be avoided.
Furthermore, Awara contains several bioactive compounds such as isoflavones among others which have many beneficial effects on human health.
In addition, according to research by Timothy Akpomie, Festus Ogungbemiro, and Samuel Anwani in 2020 on Nutritional and Elemental Composition of Awara, found that Awara has a significantly high amount of protein, fat, and carbohydrate content. The mineral compositions were also comparatively high and the Awara snack as a whole was concluded to be generally very high nutritionally and its consumption should greatly be encouraged.
With all the above-mentioned nutritional benefits of Awara, it gets better since it is consumed with other ingredients like cabbage, cucumber, onions, pepper, etc. which have several nutritional advantages.
Conclusion
It is important to note that some people add eggs to the ingredients which are not necessary. However, if you wish to add eggs to it, this is what you do:
Before you begin to fry, get a clean bowl. Break 2 eggs or more depending on the quantity of the Awara. Add a little maggi and salt to the egg and whisk it well. Then begin to dip each raw Awara into to egg before putting it into the frying pan.
Now that you know how to make Awara, try making it at home for yourself or your family.
If you find this article helpful, please leave a comment in the comments section below. Thank you.
You are always welcome to Northpad Nigeria for more local Northern Nigerian delicacies.

