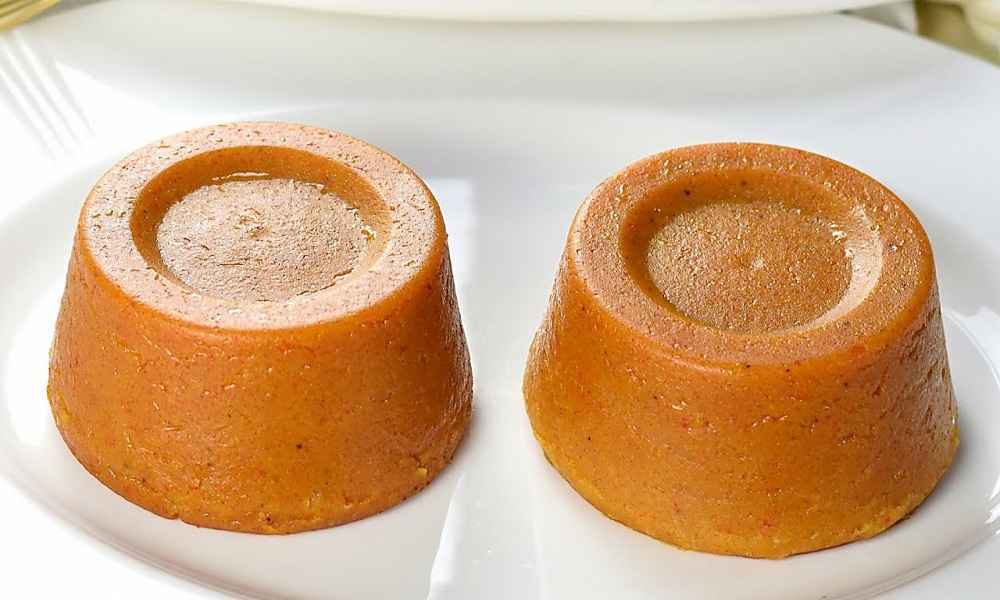
Moi Moi, (Beans Cake in English) also pronounced and spelled as Moin Moin is delicious, soft, fluffy and a must to try. It is called Alale or Alala by the Hausas, Olele/Elele by the Igbo and remains Moi Moi in the mouths of Yorubas. This meal can be prepared with beans and selected spices. It is then cooked in aluminum foil, leaves, bowls, ramekins, nylons, and tins. Let me show you how to prepare Moi Moi. Let’s go!
Ingredients for MoiMoi
2 cups of big or small beans 5 tbsp of ground crayfish 5 seasoning cubes Curry (optional) Pepper 2 big onions 2 tbsp palm oil Red bell pepper 3 eggs (optional) Smoked fish or sardine (optional) Salt to taste
Before we dive into the steps on how to prepare moi moi, let us look at the equipment we need.
STEP 1: Before anything, pick the beans to remove any dirt or stones from them.
STEP 2: After this, soak the beans with water in a medium bowl for 30–45 minutes. Some people soak their beans overnight; either way is fine.
STEP 3: Wash the beans by scrubbing them together with your palms. Here, you are creating friction between your palms so as to remove seed coats from the beans.
STEP 4: Ensure all coats are removed. Strain this water, using a strainer, into another bowl. Repeat this process until the seed coats are completely separated from the beans.
STEP 5: Rinse and wash one last time before transferring to a bowl.
STEP 6: Now, wash the onions, pepper, and red bell pepper. Remove the seeds from the red bell pepper here.
STEP 7: Add this to the beans. You may either take this to blend at the market or use a good blender at home to grind the beans to a smooth paste.
STEP 8: If you’re blending at home, add in a little water to help it grind better to a smooth paste without lumps or any difficulty.
STEP 9: Now, that’s the first step on how to prepare Moi Moi. Let’s take a step further.
STEP 10: Choose what garnishing you want here:
Eggs? Boil the eggs for 12–15 minutes. After this, remove the shells and slice them into smaller pieces of the desired size.
Fish? Boil the fish or simply buy smoked fish. Debone the fish and cut it into pieces. Set aside.
Sardine? Take the fish out of the can and set it aside.
Spring onions? Give this a wash and a nice cut. Set aside.
STEP 11: Choose what method of cooking you’d like to use to prepare this Moi Moi.
Nylon? Open them and set them aside. It’s advised that you double the nylon so as to avoid the Moi Moi from bursting open. This makes your pot messy and requires extra time for cleaning. Simply open a nylon and insert it into another nylon. This way, you’re doubling the nylon.
Tin? Grease the tin with oil and set it aside.
Aluminum foil? Grease the foil with butter or oil and set it close to you. Preheat the oven because you’ll be baking if you choose this method. Now, let’s take the next step.
STEP 12: Pour the ground paste into a bowl and stir it for at least 10 minutes. Then;
STEP 13: Slowly add in some water and continue stirring till you get a smooth texture.
STEP 14: Avoid pouring too much water to avoid ending up with a watery mixture. Moi Moi has to be slightly thick and watery. Take caution here; it has to be almost watery but not WATERY.
STEP 15: Add in palm oil or groundnut oil and give this a stir. If you’re on a healthy diet, you can use olive oil.
STEP 16: For the seasoning cubes, you should melt them in hot water to avoid eating undissolved seasoning. Use a little water for this.
STEP 17: Add salt to taste. Go easy on the salt, okay? Too much can ruin the whole meal.
STEP 18: Give this a mix again. Add in curry if you want to.
STEP 19: Add in the ground crayfish. Now add in your preferred garnishing and give it a final mix. Like a DJ, yeah? Dissssh disssh dissssh, okay? Let’s continue.
STEP 20: Add water to a pot on medium heat and leave to boil.
STEP 21: Have you decided on the method you want to use to prepare Moi Moi? Yes?
STEP 22: Now, use a ladle to scoop out the mixture into your choice of cooking until the content is finished in the bowl.
STEP 23: In each, add fish or eggs. If you’re using nylon, tie the tip, and if aluminum, seal it tight.
STEP 24: Is your water boiling or hot enough? Yes? Now add the wrapped Moi Moi to the pot containing water.
STEP 25: If you’re using tin, just place them carefully on the pot containing water.
STEP 26: Allow to steam cook for 45 minutes to an hour. Then;
STEP 27: As the Moi Moi cooks, watch the water level, and if it begins to dry up, add water to the pot to keep it from burning.
STEP 28: To check if you’re done, insert a toothpick into one, and if it comes out clean, you’re good to go. You can simply work with time or, better yet, have a taste of your soft and delicious Moi Moi.
STEP 29: When certain, take out the Moi Moi from the water and leave it to cool down.
STEP 30: Unwrap the Moi Moi and serve on a plate. Enjoy!
Recipes That Best Goes With Moi Moi
Moi moi is best eaten with rice recipes.
How to Best Serve Moi Moi
Moi moi is a versatile dish and can be served alongside Jollof Rice and Fried Rice. Because of its versatility, it can also be eaten with Garri, Pap, Custard, Koko (Pap), peppered sauce, and fish. This is why you need to know how to prepare moi moi. With Moi Moi, you can’t go wrong.
Occasions to Serve Best
Moi moi can be served at parties for lunch, dinner, and special occasions.
Nutritional Benefits of Moi Moi
This delicious delicacy is highly rich in proteins and other macronutrients that play an important role in our bodies. Beans are rich in protein, and when cooked with eggs or fish, they help enrich them.
In addition, Moi Moi also helps in promoting bowel movements (visiting the toilet) due to its fiber content, but this also helps in reducing constipation.
How to Reheat, Preserve, and Store Moi Moi
Moi moi can simply be heated the following day by heating water and allowing it to boil for at least 30 minutes. It can also be stored in the refrigerator for at least 2–3 days for longevity while still retaining its taste.
Conclusion
I know the next time you hear of this delicacy, you’ll beat your chest because you now know how to prepare Moi Moi. In addition, Moi Moi can be enjoyed with any Nigerian rice recipe with a chilled drink and, of course, with friends and family.
Making moi moi for sale requires the same procedure as the one you would make for your family. To know how to prepare moi moi for purchase, you have to take note of your target market when considering the ingredients, packaging, and quality of the moi moi.
What makes moi moi too soft?
There are a variety of reasons why your moi moi may be too soft. This could either be because you soaked the beans for too long, used tomato puree, or added too much water.
What beans is best for moi moi?
Honey beans are best for making moi moi.
What can I use to mold my Moi Moi?
Moi Moi will take the shape of any container you use. You can use leaves, nylon, tins, and ramekins to mold your moi moi.
Can I make moi moi without peeling the beans?
Yes, you can. We eat beans without peeling the back, so it is possible to make moi moi without peeling the beans. It is important to note that when making moi moi with unpeeled beans, it is best to use brown or honey beans.
What can I use instead of Moi Moi Leaf?
You can use Nylon, Tins, Ramekins, pouches, Muffin pans, etc.
Can I use nylon for my moi moi?
Sure. Moi Moi can be prepared with nylon. To avoid busting, double the nylon. This way, the second nylon serves as a layer of insurance and prevents the moi moi from spilling into the pot.
Cincin recipe otherwise spelled as ‘chin chin’ is a popular snack among Nigerians. It is consumed by almost all tribes and ethnic groups. They are common recipes for weddings, birthdays, festivals, etc. Its common ingredient is flour. In addition, it is a delicious snack, easy to make, and mostly loved by all children.
Do you have a wedding ceremony, eid, or festival and you find it difficult to come up with a snack to consume or use as a takeaway delicacy? Worry no more as I have come to your aid.
Equipment for making Cincin
Mixing bowl
Frying pan
Sieve
Scissors
Knife
Container
Ingredients
For the making of Cincin, you will need to follow the ingredients:
4 cups of flour.
1 cup of powdered milk
2 teaspoons of powdered vanilla flavor
Half a teaspoon of ground nutmeg
Small pinch of salt
3 eggs
Half a teaspoon of baking powder
Vegetable oil
1 butter
Water
Procedure for Making Cincin
STEP 1: The first thing to do is, crack the eggs in a small bowl and add a pinch of salt. Whisk together and set aside.
STEP 2: Put the sugar into a bowl, add the milk and mix.
STEP 3: In a clean bowl, sieve the flour, add baking powder and nutmeg to the bowl, and mix well. Then;
STEP 4: Add the butter to the flour and mix it very well too.
STEP 5: Add the mixture in STEP 2 and STEP 1 to the flour and mix it very well with your clean hands until a smooth dough is formed. Then;
STEP 6: Place the dough on a flat surface spread it with flour and start stretching the dough gently. However, ensure the dough isn’t too long or too thick.
STEP 7: When the dough is somewhat flat enough, use a knife and cut it into desired shapes and sizes. You could also use a scissor to do the cutting. Here, you will hold the dough with one hand and use the scissors to cut it with the other hand. For me, it is quite faster than using a knife.
STEP 8: Place a clean frying pan on medium heat, add your vegetable oil into the pan, and slice some onions into it too. Allow to fry for 3 minutes.
STEP 9: Add the cincin pieces to the hot oil and fry until it turns golden brown. Then;
STEP 10: Use a spoon to get out the fried cincin into a sieve container and allow them to cool.
STEP 11: Aaaaand your cincin is ready!
How to Serve Cincin
Cincin is usually served on plates. They can be consumed alone or with drinks. These drinks could be Kunun Zaki, Kunun Aya, carbonated drinks (though not good for your health), or other local drinks that we have.
Occasions to Serve Cincin
There are numerous occasions to best serve this delicacy or snack. It could be served in wedding ceremonies, during Sallah or Christmas periods, or during festive periods. Etc. In addition, it can be consumed anywhere, anytime.
Furthermore, they can be a part of the delicacies or snacks packed as souvenirs for guests during wedding ceremonies. In a Hausa family, Cincin is usually given to the bride among other snacks as she is taken to her husband’s house. This is to serve guests or visitors coming to wish the family well. Pretty much useful right?
How to Store Cincin
Cincin should be stored in a cool dry place. One good thing about its features or qualities is that it can last for several weeks without spoiling. Ensure to store it in the right container though.
Nutritional Value of Cincin
The Cincin recipe is majorly composed of carbs but also has moderate amounts of protein. Here are the nutrition facts for 3.5 ounces which is equivalent to 100 grams of whole-grain wheat flour: calories (340), water (11%), protein (13.2grams), sugar (0.4 grams) carbs (72 grams), fibre (10.7 grams), and fat (2.5 grams).
In addition, the consumption of Cincin has many health benefits which make it an interesting delicacy.
Conclusion
Conclusively, it is important to note that when you put too much egg in cincin recipe, it sucks up the vegetable oil, and too much vegetable oil in the human body is not healthy. However, additional eggs make it softer and not too crunchy.
If you find this article helpful, please leave a comment in the comments section below. Thank you.
We have yet another delicious delicacy for you. It’s a local snack mainly consumed in the northern part of Nigeria – Awara also known as Wara in Hausa and Soya Beans Cake or Tofu in English. Its main ingredient as the English name implies is Soy Beans. There are different ways of making it depending on one’s financial capacity. However, this article seeks to give you the general way in which it is made. Stay with me.
Because of how much people love it in northern Nigeria, it can be found in restaurants or eateries. Also, people – mostly females are found frying and selling it on almost every street in residential areas occupied by average or less privileged Nigerians.
Without wasting your time, let’s get started with its preparation.
Equipment for Making Awara
Cooking pot
Kitchen knife
Bowl
Frying pan
Slotted spoon
Cheesecloth
Ingredients
To make this delicacy, you will need the following ingredients to make Awara:
3 cups of soya beans
3 cups of lime juice or pap juice
Pepper and onions (grated)
Palm and vegetable oil
Seasoning cubes
Grated garlic
Water
Salt to taste
Procedure for Preparing Awara
STEP 1: Pick dirt and stones from the beans properly, wash them and soak it for 12 hours. If you intend to make it in the morning, you could soak it overnight.
STEP 2: Grind the soaked beans using a grinding machine or a blender and little water as you grind.
STEP 3: Pour the grinded beans into a cheesecloth to extract the milk. Keep the milk aside. Then add 2 spoons of palm oil to the extracted milk.
STEP 4: Over medium heat, place a clean pot containing the extracted milk. Allow the content to boil for 15 minutes.
STEP 5: Begin to add the lime juice or pap juice little by little. The beans’ milk automatically starts to curd on its own from the water. Allow to keep boiling for additional 25 minutes.
STEP 6: After that, pour the cud into a bowl and allow it to cool for 5 minutes.
STEP 7: Add the grinded pepper, onions, seasoning cubes, salt, and grinded garlic. Then;
STEP 8: Pour it into a cheesecloth and tie it very well so that it is well-drained. Also, remember to put a heavy object on it for about 10 minutes. This aids proper draining.
STEP 9: After draining, bring it out from the cheesecloth and cut it into desired sizes and shapes.
STEP 10: Get your frying over medium heat. Add a little vegetable oil to it, slice your onions, and put them inside. Allow to fry for 4 minutes.
STEP 11: Now you can start frying. Fry your sliced raw beans cake and sear on each side until it turns golden brown.
STEP 12: Your Awara (Soya Beans Cake) is done and ready to be eaten.
How to Serve Awara
Awara is usually served with vegetable oil, grinded pepper. Nowadays, there is more garnishing to it. Sliced fresh pepper with cabbage and cucumber are added to it. In addition, it can be taken with Pap or Kunu.
Don’t forget to serve it hot as it tastes better when hot.
Occasions to Serve Awara
There is no specific occasion for this northern Nigerian snack. Therefore, it can be consumed anytime – for breakfast with Kunu or Pap or as brunch or as dessert – your choice.
How to Store Awara
This snack doesn’t last for long. It is best consumed not later than 24 hours. So I advise you to make it just enough for present consumption.
Nevertheless, you can store it in a refrigerator and it can last for a few days but of course, the delicious taste reduces significantly.
Nutritional Value of Awara
Because of the soya beans in it, it is very rich in nutritive components. Besides the very high protein content, Awara contains a lot of fiber and is rich in magnesium and calcium. Also, its protein contains a high biological value and contains all the essential amino acids. Again, Awara is rich in unsaturated fatty acids and low in saturated fatty acids which need to be avoided.
Furthermore, Awara contains several bioactive compounds such as isoflavones among others which have many beneficial effects on human health.
In addition, according to research by Timothy Akpomie, Festus Ogungbemiro, and Samuel Anwani in 2020 on Nutritional and Elemental Composition of Awara, found that Awara has a significantly high amount of protein, fat, and carbohydrate content. The mineral compositions were also comparatively high and the Awara snack as a whole was concluded to be generally very high nutritionally and its consumption should greatly be encouraged.
With all the above-mentioned nutritional benefits of Awara, it gets better since it is consumed with other ingredients like cabbage, cucumber, onions, pepper, etc. which have several nutritional advantages.
Conclusion
It is important to note that some people add eggs to the ingredients which are not necessary. However, if you wish to add eggs to it, this is what you do:
Before you begin to fry, get a clean bowl. Break 2 eggs or more depending on the quantity of the Awara. Add a little maggi and salt to the egg and whisk it well. Then begin to dip each raw Awara into to egg before putting it into the frying pan.
Now that you know how to make Awara, try making it at home for yourself or your family.
If you find this article helpful, please leave a comment in the comments section below. Thank you.
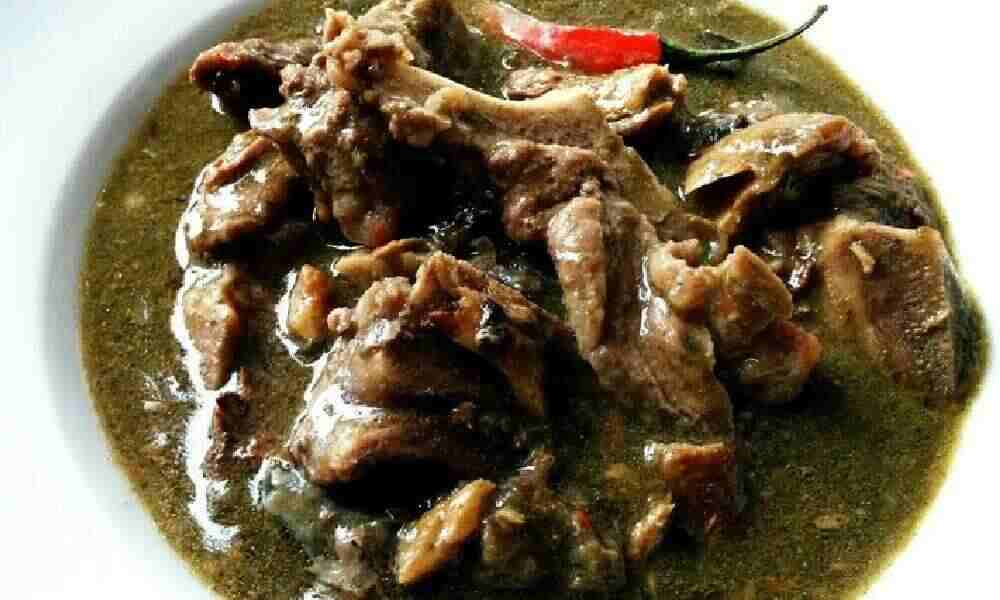
Miyan Karkashi also known in English as Sesame Leaves Soup is a local cuisine consumed in northern Nigeria by the indigenes of the area, mostly by the Hausas. It is made with dried or fresh karkashi leaves – the procedure for preparing the two varieties is the same. For those of you who like draw soups, here is one for you.
Follow me as I will be your guide on how to prepare this delicious soup that will keep you wanting to have more after your first feel of it.
Before we go fully into how it’s being prepared, I would like to draw your attention to something. You wouldn’t need any vegetable or palm oil to make it. This is because it will reduce its sliminess, which is normally needed. However, you can choose to if you want it anyway.
Equipment for Making Miyan Karkashi
Cooking pot Whisk Blender Cooking spoon
Ingredients Used for Making Miyan Karkashi
A bunch of fresh karkashi leaves (sesame leaves) or powdered karkashi leaves
A small piece of potash (kanwa).
Spices and seasoning cubes (proportional to taste).
2 spoons of locust beans (daddawa).
Fresh pepper and onions (grinded).
Fish and/or meat (size and quantity to taste).
Water (as required).
Procedure for Preparation of Miyan Karkashi
STEP 1: Cut your Karkashi leaves into small pieces (pounded or blended) and keep them aside.
STEP 2: Over medium heat, put a pot containing the required amount of water add the locust beans into it (daddawa). Allow to boil.
STEP 3: Add the fish or meat to the cooking pot and allow to cook for 25 minutes.
STEP 4: After then, add the blended Karkashi with a little amount of potash. Stir for a few minutes.
STEP 5: Lower the heat and add your seasoning and spices.
STEP 6: Continue stirring it with a whisk for 3 minutes until you get the mixture very smooth. Then;
STEP 7: Taste the soup using the cooking spoon to see if there is a need to add seasoning and/or spices.
STEP 8: Turn off the cooker and your Miyan Karkashi is ready to be served.
Swallow that Goes Best with It
Miyan Karkashi is best dished with Tuwon Masara. Personally, I prefer to take it with Tuwon Dawa. Yummy… I’m salivating already. Other swallows such as Tuwon Alkama, Tuwon Shinkafa, and others can go with it just fine – your choice.
How to Serve Miyan Karkashi
It will interest you to know that some people serve it with a red stew and take it with whatever swallow they prefer. As usual, it should be served with drinking water (bottled or sachet), and ensure you have a bib on you because there is a proclivity of you messing yourself up. Eat with caution, especially bearded guys.
Occasions to Serve Miyan Karkashi
There is no special occasion for this meal, as it can be consumed any day anytime. Again, in most Hausa communities, Miyan Karkashi and Tuwon Masara can serve as a good combination for breakfast mostly as dumame – informally translated as double-fire. Just so you know, dumame is the surplus or stored food that is eaten as breakfast in Hausa homes when warmed or microwaved.
How to Store Miyan Karkashi
You can store this cuisine in a refrigerator that is constantly powered for as long as you want. However, you stand the chance of losing its actual feel because the taste reduces. If you do not have a refrigerator, it lasts for 2 days at most and only when you keep warming mornings and evenings. Therefore, I advise you to make the quantity just enough for consumption to avoid unnecessary wastage.
Health Benefits of Miyan Karkashi
The leaf itself has a lot of health benefits for humans, some of which are:
The production of red blood cells in the body is boosted.
It increases the libido and helps boost ovulation in women
It increases human eyesight.
Because it has a low glycemic index, it is highly recommended for diabetic patients.
When consumed in soup form, it adds to its nutritional value. This is because of the ingredients such as meat, pepper, tomatoes, etc. that are contained in it.
Conclusion
Don’t forget, if you want to get the taste and feel of the real Miyan Karkashi, please, do not use any oil when preparing it. As you have seen, it is very easy to prepare. Hope this was helpful. Tell me in the comments section when you will be making yours.
If you find this article helpful, please leave a comment in the comments section below. Thanks.
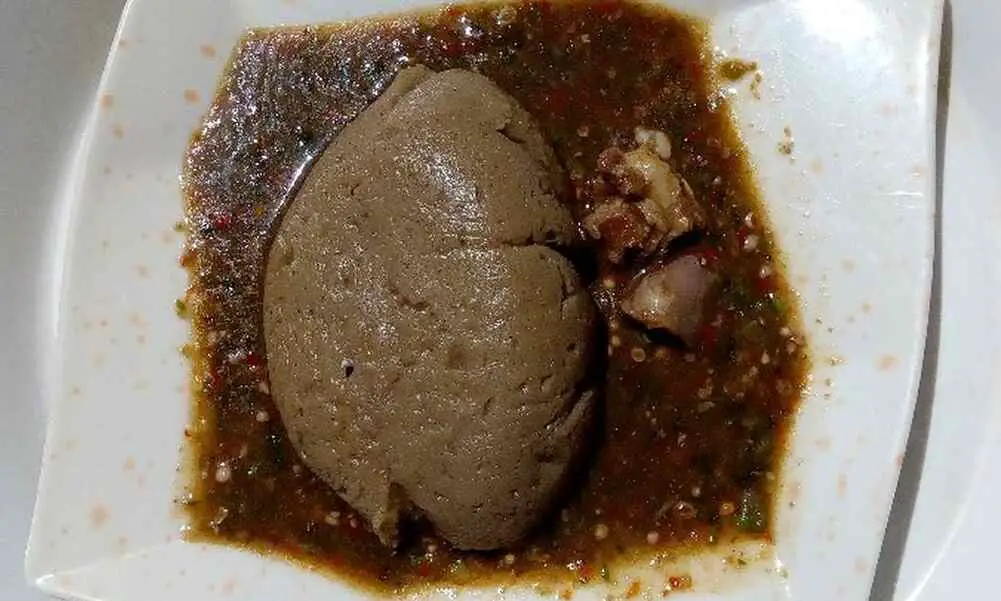
Tuwon Dawa specifically, is the least consumed of all the types of Tuwos that we have (Tuwon Shinkafa, Tuwon Alkama, Tuwon Masara, Tuwon Semo, etc.). It is usually dark brown, kind like Yoruba’s most decorated swallow – Amala. It is easy to prepare, just like Tuwon Masara and the procedure for its preparation is somewhat the same. This article seeks to teach you how to prepare Tuwon Dawa (yadda ake Tuwon Dawa) without much stress.
Permit me to go straight into it!
How to Prepare Tuwon Dawa
Equipment
Cooking pot Wooding spatula Bowl Warmer Leather
Ingredients for Making Tuwon Dawa
Ingredients needed to prepare this recipe are:
Guinea corn Flour
3 liters of water.
Procedure for Making Tuwon Dawa
STEP 1: Grind the guinea corn into flour and sieve it well. Ensure fine texture
STEP 2: In a clean bowl of cold water, pour a little guinea flour into it. Stir it well until perfectly mixed and in a watery state. (This is known as the talge).
STEP 3: Over medium heat, get a clean pot containing 3 liters of water on the fire and allow it to boil.
STEP 4: Pour the mixture in Step 2 into the boiling water. Stir properly until thick like pap.
STEP 5: Allow boiling for 5 minutes.
STEP 6: Add the guinea corn flour into the pot little by little as you stir. Continue to stir until desired thickness is achieved.
STEP 7: Reduce the heat of your cooker and allow it to steam for 5 minutes.
STEP 8: Mold your Tuwon Dawa into balls, put them in leather, and put them in a warmer.
It is best consumed as lunch and dinner. Sometimes, the surplus can be used as breakfast (as dumame). Dumame is the Hausa name for double-fire.
But it’s not advisable to serve during festive periods like Eids. It is also not advisable to serve on wedding ceremonies, naming ceremonies, birthdays, etc.
How to Store Tuwon Dawa
By warming it in the morning and evening, it could last for 2 days. However, if kept in a refrigerator, it could last for more days, although, its tastes could be affected. So, preferably, make just enough for consumption and probably for not more than 2 days.
However, just like Tuwon Semo, Tuwon Dawa is not interesting when warming it the traditional way (i.e. putting the molds in a pot containing water and allowing it to boil). The best way to warm it is by using a microwave.
Health Benefits of Tuwon Dawa
As humans, we need the energy to take care of our daily life struggles. As such, we need this northern Nigerian delicacy as it contains a high amount of carbohydrates.
However, it is not advisable for diabetic patients as it contains a high amount of starch. So diabetics should keep off, please.
Conclusion
As you have seen, Tuwon Dawa is very easy to prepare. It could even be prepared by an amateur cook – like children learning to cook. In addition to its importance, it tastes nice. Nonetheless, one of its setbacks to many is that it is not good-looking at all, I must say.
Personally, I prefer to take it in the evening. Now tell me, when do you intend to make this for yourself or your family?
If you find this article helpful, please leave a comment in the comments section below. Thank you.