
by Angela Bala | Feb 6, 2022 | Food & Kitchen, Local Delicacies
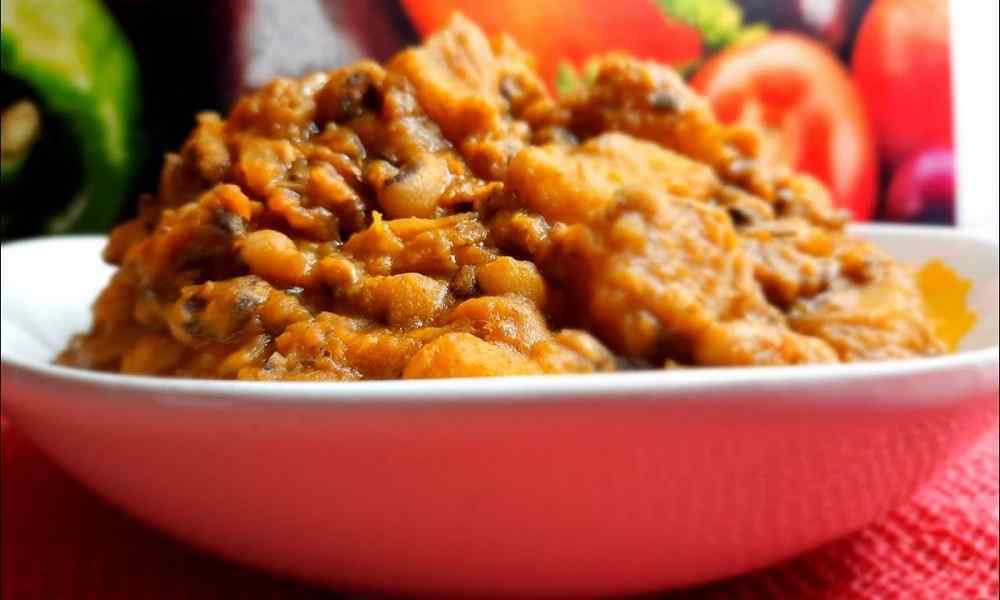
Sweet potatoes are root vegetables that are highly nutritious and a great source of fiber, vitamins, and minerals. It is a great substitute for African yams in many local recipes. These recipes include porridge, which happens to be our main focus today. The sweet potato porridge recipe, or pottage, as some people like to refer to it, or Faten Dankali in Hausa, is a typical Nigerian dish that features mostly vegetables like sweet potatoes and some of our local condiments, which makes it more of a medicine than just a means to quench hunger. This potato porridge recipe is pretty standard, easy, and very healthy.
Furthermore, it is a homemade recipe that can be done easily with few ingredients. These ingredients can be found anywhere, regardless of location, and are ready to be consumed in no time. All potatoes are actually welcome in this recipe.
If you wish to be a partaker of all this goodness, then keep scrolling!
Equipment for Making Sweet Potato Porridge
Ingredients for Making Sweet Potato Porridge
Healthy potato porridge is made of all the ingredients below:
Sweet Potatoes
Palm Oil
Onions (chopped or diced)
Fresh Pepper (atarugu)
Chili (shombo)
Bell Pepper (tattasai)
Crayfish (ground)
Seasoning Cubes
Salt
Garlic
Fresh Ugu Leaves or Spinach (Alayyahu)
Scent Leaves (efirin) or Basil Leaves
Water or Stock (meat or fish)
NOTE: All ingredients listed above are the necessary ingredients in this recipe. You can also add, substitute, or subtract any ingredient to suit your taste perfectly, as there is no rule that says you cannot add to the already-listed ingredients.
Let’s get creative, guys!
Procedures for Preparing Sweet Potato Porridge
STEP 1: Peel and chop the potatoes into desired sizes. Put it in a bowl of water immediately to avoid discoloration.
STEP 2: Wash vegetables with vinegar or salt, cut them carefully, and put them into a clean bowl.
STEP 3: Blend all the different peppers and set them aside. Then;
STEP 4: Place a pot on fire and add enough oil that can go around for the number of potatoes chopped. Add onions to the oil once it gets hot, but do not let the oil bleach.
STEP 5: Immediately after the oil starts to sizzle, add blended pepper and fry for some time before adding seasoning cubes, salt, crayfish, and any other ingredient of choice. Stir well.
STEP 6: Add a reasonable amount of water or meat stock to the mixture and boil for a few minutes.
STEP 7: Stir in the potatoes and make sure the water is up to the potato level; if not, add in more water, cover the pot, and allow it to boil. Stir occasionally to help the porridge thicken, and add more water if it’s still too dry.
STEP 8: Once the porridge has taken on a thick form, add the vegetables and leaves and leave to simmer on medium heat for a minute in order to retain the nutrients in the vegetables.
STEP 9: Remove from heat, and your sweet potato porridge is ready!
How to Serve Sweet Potato Porridge
The sweet potato porridge recipe can eminently be consumed with beverages and complements of any kind as you see fit, or it could just be taken plain without anything; either way, it will still taste great. Needless to say, sweet potato porridge is best served hot.
Occasions Best to Serve Sweet Potato Porridge
Although sweet potato porridge is said to be a really healthy way to start the day, as it is full of fiber, healthy carbs, and vitamin A, we cannot call it a breakfast meal; it can be served at any time of the day or on any occasion whatsoever, as we need nutrients every hour of the day.
How Sweet Potato Porridge Is Stored
In order to retain the quality of sweet potato porridge, it is advised to store it in a refrigerator where it stays fresh and does not go bad.
Nutritional Benefits of Sweet Potato Porridge
Studies show that just one sweet potato provides 400% of the vitamin A needed each day, which helps keep the eyes healthy, prevents macular degeneration, and helps boost the immune system. As they are rich in antioxidants and enhance brain functioning, they are shown to be a better source of beta-carotene than most vegetables. With the number of nutrients sweet potatoes give when consumed, they may help with diseases like cancer, diabetes, heart disease, obesity, and many more. Let’s not forget the other vegetables and ingredients in the porridge, which is also highly rich in vitamins and protein.
In essence, sweet potato porridge is very nutritious, medicinal, and healthy, as we effectively get a good amount of all our daily vitamins in just one meal.
Conclusion
This homemade sweet potato porridge recipe is tasty, nutritious, very healthy, and a great substitute for yam porridge to lessen the intake of carbs into the body system. Now that you have reached this point with me, my faithful comrades, here’s a huge tip: be a full partaker of all this goodness! Try it at home and share it with your family and friends. Don’t be stingy, guys! And like I said earlier, be creative to the best of your ability.
If this recipe was in any way helpful to you, please leave a comment in the comments box and let me know the final outcome of your first tryout of this recipe.
You could also check out 8 Amazing Dishes You Can Make with Yam.
by Abu Hafsah | Jan 23, 2022 | Food & Kitchen
Faten Wake, otherwise known as Beans Porridge in the English language, is a food consumed basically by almost all tribes in Nigeria. I seriously don’t know any tribe that doesn’t. To be more specific, the Yorubas are the major consumers of this type of recipe. This article seeks to walk you through how to prepare bean porridge (faten wake).
The primary ingredient for this delicacy is beans. Of course, it has to be because the name of the recipe implies that.
What are we waiting for? Let’s get started on how to prepare bean porridge!
Equipment for Making Beans Porridge
Ingredients for Making Beans Porridge
2 cups of beans
Spices (maggi, curry powder, etc.)
Vegetables like pepper, onions, tomatoes, etc.
A small bunch of spinach (optional)
½ cup of vegetable or palm oil
Boiled or fried meat or fish (optional)
Salt to taste
Procedure for Making Faten Wake
STEP 1: Pick the dirt out of the beans
STEP 2: Wash the beans well. Then;
STEP 3: Over medium heat, put the washed beans in a pot and allow them to cook. Do this for 30 minutes. If you wish, you could add kanwa (potash) to it to speed up the process.
STEP 4: By now, the beans are soft. Wash the beans well with clean water and put them in a bowl. Set this aside.
STEP 5: Put a clean pot over medium and pour in your vegetable or palm oil.
STEP 6: Slice your onions, tomatoes, and pepper and put them into the pot in STEP 5. Allow to fry for 10 minutes. Ensure you stir gently from time to time to avoid sticking to the bottom of the pot.
STEP 7: Now, add a little water to the pot and pour in your meat or fish. Remember, adding meat or fish is optional. Allow it to boil for 5 minutes.
STEP 8: Add your boiled beans to the pot and stir gently. Leave to cook for another five minutes.
STEP 9: Now slice your spinach and wash thoroughly before you add it to the pot. Allow to simmer.
STEP 10: Add in your salt, Maggi, and other spices like curry powder. Allow it to cook for 5 minutes too.
STEP 11: Taste the meal and add spices if need be. Turn off the cooker, and your Faten Wake is done.
How to Serve Faten Wake
Faten Wake recipe is served with soaked or raw garri (soak the garri and eat with the beans or pour the raw garri on the recipe and stir, then eat), bread, water, etc. You could also eat it with fried plantains, fried chips, boiled or fried eggs, and lots more.
Don’t forget to serve it hot, as it tastes better when hot.
Occasions to Serve Faten Wake
Faten Wake can be eaten as breakfast, lunch, or dinner. Yorubas even serve it at naming ceremonies, weddings, festivals, etc. Basically, Faten Wake is for all occasions.
How to Store Faten Wake
Beans have a high tendency to spoil; as a result, ensure you make just enough for immediate consumption. However, if it is more than enough, you can store it in a refrigerator, and that will make it last for days to the detriment of its delicious taste.
Nutritional Value of Faten Wake
Because the major constituent is beans, Faten Wake helps in repairing the body as it contains protein; it helps in making healthy red blood cells, and it helps in preventing neural tube defects in a fetus during pregnancy.
In addition, people who consume beans on a regular basis are less likely to die of heart attacks or other cardiovascular illnesses. It also helps in reducing the risk of cancer, stabilizing blood glucose or even preventing diabetes, preventing fatty liver, and lots more.
Conclusion
As you have seen, how to prepare Beans Porridge (Faten Wake) is like a walk in the park if you follow the above-mentioned steps. If this recipe is new to you, I hope you try making it soon so as not to miss out on its amazing taste.
If you find this article helpful, please leave a comment in the comments section below.
You are always welcome to visit Northpad Nigeria for more local Northern Nigerian delicacies.

by Fatima Sani | Jan 16, 2022 | Local Delicacies
Fankasau recipe is a traditional snack that originated from the northern part of Nigeria – mostly among the Hausas. Its basic ingredient is flour and it is very easy to make and tastes delicious.
Let’s not waste any time and get right into how it is been prepared.
Equipment for Making Funkasau
Frying pan
Bowl
Sieve
Tray
Container
Slotted spoon
Fankasau Recipe
Ingredients
To make this delicacy, you will need the following ingredients:
3 cups of wheat flour
1 spoon of yeast
1 teaspoon of kanwa (potash)
Water
1 teaspoon of salt
Vegetable oil
Fankasau Recipe
STEP 1: Wash your wheat properly and remove stones from the grains. Spread it under the sun to dry then take it to the grinders to grind it for you.
STEP 2: After grinding, allow it to cool for 10 minutes.
STEP 3: Sieve the powdered wheat and set it aside. Then;
STEP 4: Soak the yeast with water and add some potash (kanwa) and mix.
STEP 5: Add a little salt inside the powdered wheat, pour water, and make a thick paste. Ensure it’s not too thick though.
STEP 6: Cover the paste and keep it in a warm place to rise for an hour.
STEP 7: Rub oil in your palm and mix it again. Then;
STEP 8: Rub oil at the back of a tray. Then place a little of the Fankasau mixture on it.
STEP 9: Get a little vegetable oil in a small container. Dip your hand in it and make a hole in the middle of the Fankasau mixture.
STEP 10: Over medium heat, place a frying pan and add 2 cups of vegetable oil and slice some onions in it and allow to fry.
STEP 11: When the onion slices are fried, add the Fankasau gently into the hot oil and allow to fry for 15 minutes. Then;
STEP 12: Use a slotted spoon to get the friend Fankasau into a sieve container. The sieve is to drain the oil on the surface of the Fankasau.
STEP 13: Scoop the fried pieces of Fankasau onto a flat and try to dry and cool down quickly.
STEP 14: Ta-da! Your Fankasau is ready.
How to Serve Fankasau
Traditionally, Fankasau recipe is mostly served with Miyan Taushe. Some prefer to take it with sugar by dipping it into a container containing sugar and then eating it. Personally, my preference is Miyan Taushe. Ensure to serve hot as it tastes best.
Occasions to Serve Fankasau
This recipe is served on various occasions including eids, weddings, naming ceremonies, or any festival.
How to Store Fankasau
It is advisable to store this delicacy in a cool dry place because it lasts longer – say 10 days. To avoid spoilage or wastage, you could just make it in small quantities for immediate consumption.
Alternatively, you could store it in a refrigerator but its taste will definitely diminish the longer it stays refrigerated.
Nutritional Value of Fankasau
Because of the wheat grain in this recipe, helps in controlling obesity, improving body metabolism, prevention of type 2 diabetes, reducing body inflammation, prevention of breast cancer, and so on.
Conclusion
Now that you know how to prepare Fankasau, it would be nice if you try making it. When you do, could you please share with us your experience here?
If you find this article helpful, please leave a comment in the comments section below.
You are always welcome to Northpad Nigeria for more local Northern Nigerian delicacies.

by Fatima Sani | Jan 8, 2022 | Local Delicacies
Kunun Tsamiya recipe is a northern Nigerian delicacy that is mainly made from powdered millet and tamarind (tsamiya) – that is where the name even came from. It is a very common drink among the Hausas especially for nursing mothers as it is believed that it helps increase breast milk.
Without any delay, let’s get into how it is been prepared. Allow me to be your guide
Equipment for Making Kunun Tsamiya.
Sieve
Bowl
Cheesecloth
Cooking pot
Scoop
Ingredients
2 cups of powdered millet.
Tamarind in the quantity desired.
Spices (dried pepper, ginger, cloves.
Sugar
Water
Procedure for Preparing Kunun Tsamiya
STEP 1: Wash the millet and soak it for 6 hours. You could soak it overnight if you intend to make it in the morning.
STEP 2: By now, the millet grains are soft. Wash again with clean water and add your spices – dried pepper, ginger, and cloves.
STEP 3: Take it to grinders to grind it for you. After grinding, leave it to cool for 10 minutes.
STEP 4: Add more water to the ground millet to enable you to sieve it well and set it aside.
STEP 5: Over medium heat, place a clean pot and add water and tamarind into the pot. Allow it to boil. Alternatively, you could soak it for 30 minutes if you have enough time to spare.
STEP 6: Pour the powdered millet into a clean bowl and add some water. Stir it very well with a spoon of your choice.
STEP 7: When STEP 5 has reached boiling point, take it down and pour the boiling water into the mixed millet powder.
STEP 8: After that, start stirring it gently. But when it gets too thick for your liking, you can still add some water.
STEP 9: Add sugar to your taste to the Kunun Tsamiya and you are done!
As easy as that!
How to Serve Kunun Tsamiya
You can take Kunun Tsamiya recipe with Akara (Beans Cake), Kuli-Kuli (Groundnut Cake), Cincin, or any snack of your choice. It will interest you to know that you could just take this recipe alone without anything to go with it – it tastes just fine.
Occasions to Serve Kunun Tsamiya
To the best of my knowledge, there are no special occasions for the consumption of this pap recipe. This means that it can be consumed anywhere and anytime. Well, as I said earlier, it is advisable for breastfeeding mothers to take it as it is said to increase breast milk flow.
How to Store Kunun Tsamiya
Kunun Tsamiya recipe in its best quality does not last for more than 24 hours. In addition, it cannot be stored in a refrigerator. On that note, I suggested you make just enough for present consumption.
Nutritional Value of Kunun Tsamiya
Kunun Tsamiya’s health benefits cannot be overemphasized as it helps in heart health, diabetes management, and helps prevent asthmatic symptoms because of the millet in it.
Because of the Tamarind in it, it helps boost the immune system, improves digestion, improves blood circulation, aids weight loss, fights cancer and rapid aging among others.
Conclusion
As you have seen, this recipe is easy to make but for its taste, you will need to prepare it to feel it firsthand. So tell me, when do you intend to make it? For a change, try and make this for breakfast for yourself or your family.
If you find this article helpful, please leave a comment in the comments section below. Thank you.
You are always welcome to Northpad Nigeria for more local Northern Nigerian delicacies.

