by Fatima Sani | Mar 27, 2022 | Local Delicacies
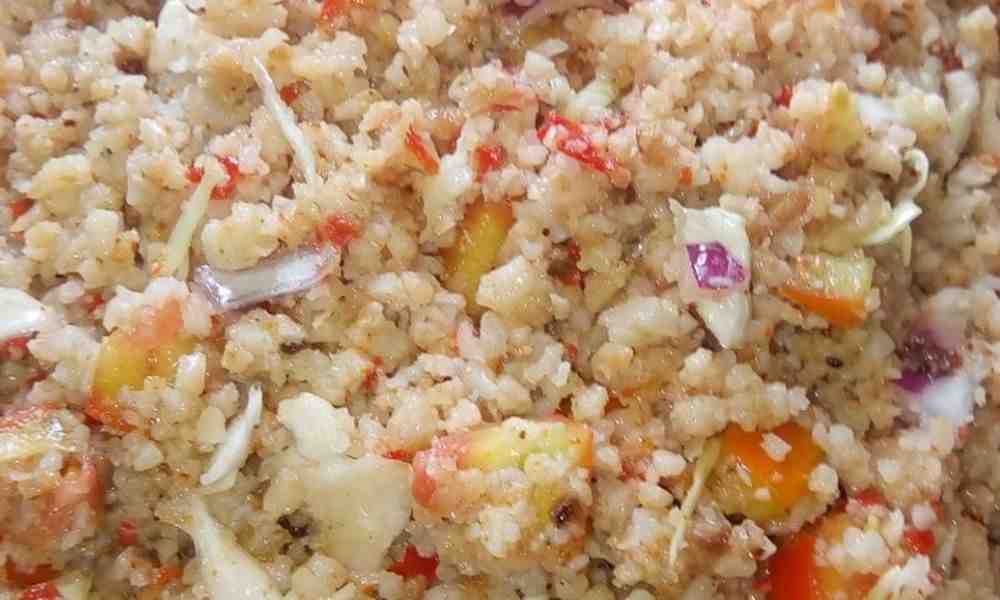
Kwadon Kanzo is yet another Northern Nigerian delicacy consumed primarily by the Hausas and Fulanis. The recipe is enjoyed by many, young and old, poor, average, and even some wealthy families. This article seeks to teach you how to prepare the Kwadon Kanzo recipe. Stay with me. But first, what is this ‘Kanzo’?
Kanzo is a burnt part of the Tuwo (that of shinkafa, masara, dawa, alkama, and the like) meal. It is obtained by allowing the bottom of the pot to cook until it forms a dry crust called Kanzo.
Let’s dive into it!
Equipment for Making Kwadon Kanzo
Ingredients
5 cups of Kanzo (burnt part of Tuwo)
Tomatoes, peppers, and onions.
1½ cups of groundnut cake (Kuli-Kuli)
Seasonings and salt to taste
¼ cup of fried vegetable oil
Cucumber (optional)
Procedure for Preparing Kwadon Kanzo Recipe
STEP 1: Get a clean mortar (turmi) and pestle (tabarya), put the kanzo, and grind it into small pieces. Then;
STEP 2: Put it in a clean bowl and add water to it. Allow soaking for 5 to 10 minutes, depending on how hard the kanzo or crust is.
STEP 3: Strain the Kanzo in a strainer (matsami or rariya) to drain off the water completely. Then;
STEP 4: Grind the Kuli-Kuli (groundnut cake), cut the tomatoes, cucumber (optional), and pepper, and set them aside.
STEP 5: Now, in a mixing bowl, add the content in STEP 4, fried groundnut oil, seasonings, and a pinch of salt. Then;
STEP 6: Mix the content in STEP 5 well until properly combined.
STEP 7: Ladies and gentlemen, your Kwadon Kanzo is ready!
How to Serve Kwadon Kanzo Recipe
Serve it with properly cut or sliced vegetables to make it look very appetizing. You could also add cabbage to the above-listed ingredients if you so wish, to make it taste even better.
Occasions to Serve Kwadon Kanzo Best
It is best consumed as any of the basic meals or as a dessert. This makes it good for consumption at any time. However, it is not advised that you make it for festivals, ceremonies, or the like.
How to Store Kwadon Kanzo Recipe
This delicacy cannot be stored for more than 24 hours. 24 hours could even be too much time. You could try storing it in a refrigerator, but be assured that it won’t taste as good as you would have wanted it.
As a result, it is best to prepare the quantity just enough for consumption at a certain time. If you need more, you could always prepare another one. After all, it is very easy to make.
Nutritional Value of Kwadon Kanzo
We, as humans, need the energy to take care of our daily struggles. As such, we need this northern Nigerian cuisine as it contains a great deal of carbohydrates. This is because all of the vitamins that form the Kanzo used in this delicacy are carbohydrates.
Conclusion
As we have seen above, the Kwadon Kanzo recipe is very easy to make and tastes delicious when properly prepared. You could try it someday for yourself or your family. However, don’t forget to share your experience with us when you do.
If you find this article helpful, please leave a comment in the comments section below as well.
You are always welcome to visit Northpad Nigeria for more local Northern Nigerian delicacies.
You may also be interested in knowing how to make French Toast Recipe, Baked Salmon Loaf recipe, How to Make Nigerian Abacha Food, and Delicious Fish Mayonnaise Recipe.
by Aisha Zakari | Feb 11, 2022 | Beauty & Fashion
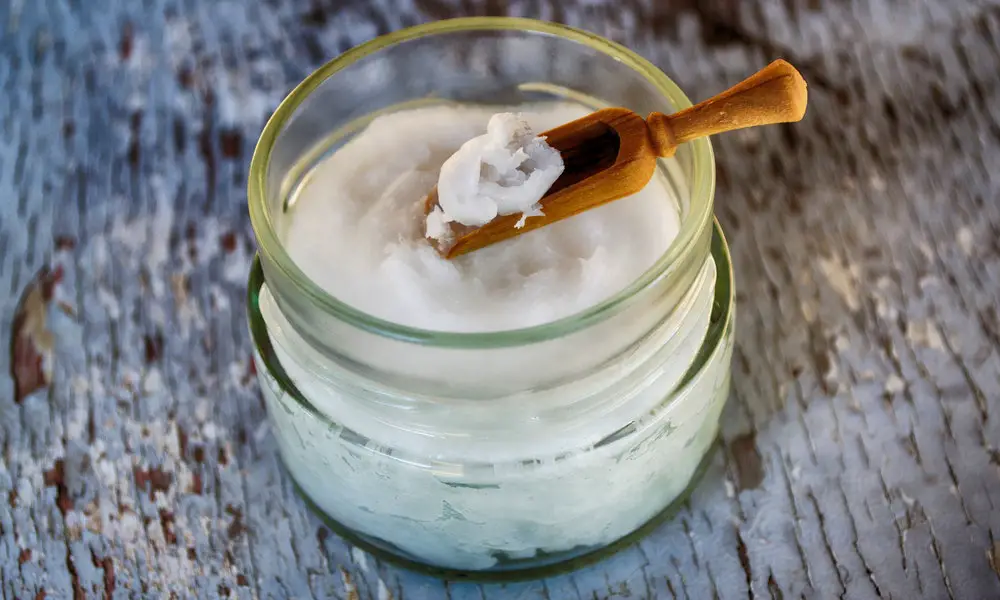
Want to say goodbye to dry and chapped lips and say hello to soft and luscious lips? Want to do something fun and easy? You’re in the right place cause I’m about to put you through how to make Coconut Oil Lip Balm.
Follow these steps to make this moisturizing homemade Coconut Oil Lip Balm. Be sure to gift to friends and loved ones.
What Is a Lip Balm?
A lip balm is a substance that is added to the lips to moisturize and relieve chaps and dryness. A lip balm is generally made from a base mostly coconut oil or beeswax, vitamin E capsules for Adee moisturizing effect, a flavor, and a colour. Just like that, you have a go-to for soft and luscious lips!
What You Will Need in Preparing a Lip Balm
- Small containers or tubes
- Glass bowl to mix
- A stirrer or a spoon
- Essential oils (coconut, almond, etc.)
Now, that you know the basics of the recipef any homemade lip balm, let’s get to something interesting to further educate you.
Benefits of Selected Essential Oils
Essential oils are used mostly in a few drops. Be sure not to overuse because of their potency.
- Coconut oil helps in penetrating the skin more deeply and helps in moisturizing the lips.
- Almond oil is enriched with vitamin A and E hence, it penetrates deeper into the ski more quickly. It’s very moisturizing and perfect for dry and chapped lips.
- Beeswax is hydrating and increases moisture in the skin. They are commonly found in hand and body creams as it helps to retain moisture. Now, I hope this educated you on why you need these ingredients. Let’s do what we’re here for now.
How to Make Homemade Coconut Oil Lip Balm
Ingredients
- 2tbsp coconut oil
- 1tbsp beeswax (crushed)
- 5-6 drops of honey
- 2 capsules of vitamin E
Procedures
STEP 1: On medium heat, bring a pot of water to a boil.
STEP 2: Insert a glass bowl into this pot. Make sure it doesn’t tilt and fall, you can hold the glass bowl with a tong. It’d only for a minute.
STEP 3: Add in crushed beeswax and coconut oil.
STEP 4: Allow to melt completely for at least 20-30 seconds. Then;
STEP 5: Add in honey and give this a mix.
STEP 6: Take this off the heat. Add in vitamin E capsules and give a final mix.
STEP 7: Allow to cool and transfer to a small container or tube.
STEP 8: Set aside for usage.
Frequently Asked Questions about Homemade Coconut Oil Lip Balm
Q: What can I use instead of coconut oil?
A: Shea butter is a good recipe for homemade Coconut Oil lips balm. You can also substitute shea butter for coconut oil if you have it in-store.
Q: I don’t have beeswax, what do I use?
A: Relax! You can go ahead and make your homemade Coconut Oil lip balm without having to use beeswax. Beeswax is like a solidifier so you can go ahead to use coconut oil, shea butter, or castor oil as the base.
Q: Can I use a container instead of a tube?
A: As I said above, you can use a container or you use a tube lying around in the house. This is used as storage and anything you have available can be used. Make sure it has a cover so as to prevent contamination such as dust and dirt.
Q: How long will my homemade Coconut Oil lip balm last?
A: Your homemade Coconut Oil lip balm should last up to 2-3 months depending on the quantity you make and on your daily usage.
Q: Does lip balm lighten my lips?
A: Homemade Coconut Oil lip balm does not lighten lips but help in moisturizing. If you want lighter lips, you could use lemon or lemon oil. Lemon has been proven to be effective in lightening the lips and of course, the skin.
Another option is to scrub your lips at least once.
Q: How long does it take to solidify?
A: This should take at least 15 minutes to harden in the container or of course, tube.
Key Notes to Homemade Coconut Oil Lip Balm
- Ensure the container or tube is clean before transferring so as to avoid contamination of any sort.
- Crush beeswax into smaller pieces so as to enable it to melt easily and quickly when placed overheat.
How to Store
Store in a cool dry place, this helps in solidifying it. You can also refrigerate it for an hour or two to speed the solidification process but after that, do not refrigerate as this could lose its form and potential.
Conclusion
Wasn’t that fun, easy and exciting? The best part of this recipe for homemade Coconut Oil lip balm is the flexibility to customize colours with the oil and infused fruits.
I hope this was helpful. If it was, leave a positive comment in the comments section below.

by Aisha Zakari | Feb 11, 2022 | Beauty & Fashion
Want to say goodbye to dry and chapped lips and say hello to soft and luscious lips? Want to do something fun and easy? You’re in the right place cause I’m about to put you through how to make Shea Butter Lip Balm.
Follow these steps to make your moisturizing homemade Shea Butter lip balm. Be sure to gift to friends and loved ones.
What Is a Lip Balm?
A lip balm is a substance that is added to the lips to moisturize and relieve chaps and dryness. A lip balm is generally made from a base mostly Shea Butter or beeswax, vitamin E capsules for Adee moisturizing effect, a flavor, and a colour. Just like that, you have a go-to for soft and luscious lips!
What You Will Need in Preparing a Lip Balm
- Small containers or tubes
- Glass bowl to mix
- A stirrer or a spoon
- Essential oils (coconut, almond, etc.)
Now, that you know the basics of the recipe for homemade lip balm, let’s get to something interesting to further educate you.
Benefits of Selected Essential Oils
Essential oils are used mostly in a few drops. Be sure not to overuse because of their potency.
- Shea Butter helps in penetrating the skin more deeply and helps in moisturizing the lips.
- Almond oil is enriched with vitamin A and E hence, it penetrates deeper into the ski more quickly. It’s very moisturizing and perfect for dry and chapped lips.
- Beeswax is hydrating and increases moisture in the skin. They are commonly found in hand and body creams as it helps to retain moisture. Now, I hope this educated you on why you need these ingredients. Let’s do what we’re here for now.
How to Make Homemade Shea Butter Lip Balm
Ingredients
- 1tbsp shea butter
- 1tsp beeswax (crushed)
- 1tsp honey
- 5 drops of rose oil, lavender or vanilla oil
- 1tsp coconut oil or avocado oil
Procedures
STEP 1: On medium heat, bring a pot of water to a boil.
STEP 2: Insert a glass bowl into this pot. Make sure it doesn’t tilt and fall, you can hold the glass bowl with a tong. It’d only for a minute.
STEP 3: Add in crushed beeswax and coconut oil, allow to melt completely for at least 20-30 seconds.
STEP 4: Add in shea butter and allow to melt again. Then;
STEP 5: Add in honey and drops of desired oil. Give a final mix.
STEP 6: Allow to cool down before transferring to a container or a tube.
STEP 7: Apply to lips to care and moisturize them.
Frequently Asked Questions about Homemade Shea Butter Lip Balm
Q: What can I use instead of Shea Butter?
A: Shea butter is a good recipe for homemade Shea Butter lips balm. You can also substitute shea butter for Shea Butter if you have it in-store.
Q: I don’t have beeswax, what do I use?
A: Relax! You can go ahead and make your homemade Shea Butter lip balm without having to use beeswax. Beeswax is like a solidifier so you can go ahead to use Shea Butter, shea butter, or castor oil as the base.
Q: Can I use a container instead of a tube?
A: As I said above, you can use a container or you use a tube lying around in the house. This is used as storage and anything you have available can be used. Make sure it has a cover so as to prevent contamination such as dust and dirt.
Q: How long will my homemade Shea Butter lip balm last?
A: Your Shea Butter lip balm should last up to 2-3 months depending on the quantity you make and on your daily usage.
Q: Doesshea butter lip balm lighten my lips?
A: Your Shea Butter lip balm does not lighten lips but helps in moisturizing. If you want lighter lips, you could use lemon or lemon oil. Lemon has been proven to be effective in lightening the lips and of course, the skin. Another option is to scrub your lips at least once.
Q: How long does it take to solidify?
A: This should take at least 15 minutes to harden in the container or of course, tube.
Key Notes to Homemade Shea Butter Lip Balm
- Ensure the container or tube is clean before transferring so as to avoid contamination of any sort.
- Crush beeswax into smaller pieces so as to enable it to melt easily and quickly when placed overheat.
How to Store
Store in a cool dry place, this helps in solidifying it. You can also refrigerate it for an hour or two to speed the solidification process but after that, do not refrigerate as this could lose its form and potential.
Conclusion
Wasn’t that fun, easy and exciting? The best part of this recipe for homemade Shea Butter lip balm is the flexibility and ease to make it. What do you think?
I hope this was helpful. If it was, leave a positive comment in the comments section below.
by Fatima Sani | Jan 30, 2022 | Local Delicacies
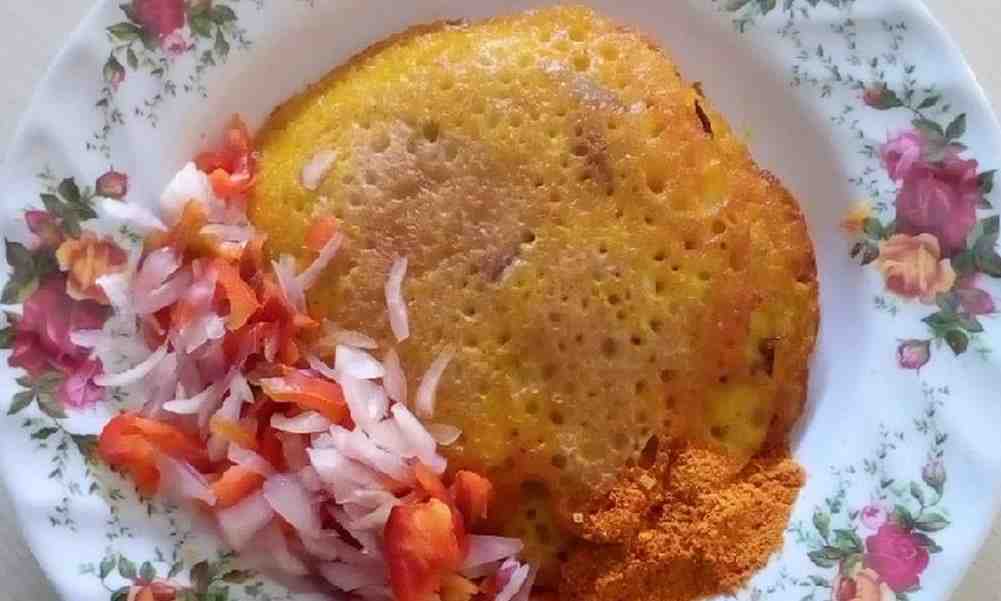
The Wainan Fulawa recipe is a northern Nigerian delicacy fried in a manner just like sinasir. Its primary ingredient is wheat flour. It is quite easy to make. Stay with me as I show you how to prepare this delicious northern Nigerian cuisine.
Equipment for Making Wainan Fulawa
Ingredients for Making Wanan Fulawa
The ingredients needed for the preparation are:
Two (2) cups of flour
Fresh pepper
Seasoning cubes
Salt to taste
Vegetable oil
Two (2) eggs (optional)
Procedure for Preparing Wainan Fulawa
STEP 1: Get a clean bowl, sieve the flour, and set it aside.
STEP 2: Grind your pepper and put it inside the sieved flour. Then;
STEP 3: Slice the onions into small pieces and put them inside.
STEP 4: Add a little water and stir it together. Then;
STEP 5: If you choose to make use of eggs, whisk the eggs in a small bowl and add your seasoning cubes to taste.
STEP 6: Add water gradually until it is well combined or mixed. Then;
STEP 7: Place a frying pan over medium or low heat and add some oil – just a little vegetable oil.
STEP 8: When the vegetable oil gets hot, scoop in the batter. When frying, you will see bubbles on top of the Wainan Fulawa.
STEP 9: Flip it to the other side and allow it to fry for 2 minutes, but on low heat. Repeat the process until you are done with the batter.
STEP 10: When done, turn off the heat, and your Wainan Fulawa is done.
How to Serve Wainan Fulawa
It is served with ground dry pepper, and if you like, you could take it with fried palm oil. More so, Kunun Gyada, Kunun Tsamiya, Kunun Tamba, and most Kunus will go with it.
It tastes better when served hot.
Occasions to Serve Wainan Fulawa Best
This delicacy can be prepared any day, anytime, anywhere. As a result, you can take it for breakfast, lunch, dinner, naming ceremonies, sallah periods, birthday parties, wedding ceremonies, etc.
How to Store Wainan Fulawa
Wainan Fulawa is just like Sinasir in terms of storage. It is best stored in a cool, dry place, like a warmer. Also, it can last for two days. It makes it last longer when stored in a refrigerator.
Nutritional Value of Wainan Fulawa
Wainan Fulawa is primarily composed of carbs but also has moderate amounts of protein. Here are the nutrition facts for 3.5 ounces, which is equivalent to 100 grams of whole-grain wheat flour: calories (340), water (11%), protein (13.2 grams), sugar (0.4 grams), carbs (72 grams), fiber (10.7 grams), and fat (2.5 grams).
In addition, eating Wainan Fulawa has many health benefits which make it an interesting delicacy.
Conclusion
Wainan Fulawa’s recipe is delicious, as a lot of people I know have testified. It is one of my favorite local delicacies, and I love to take it for breakfast.
It will interest you to know that you don’t necessarily need to fry it with vegetable oil, palm oil too can do the job just fine.
Now that you know how to prepare Sinasir, tell me in the comments section below your experience on it.
You are always welcome to Northpad Nigeria for more local Northern Nigerian delicacies.

by Fatima Sani | Jan 30, 2022 | Local Delicacies
The sinasir recipe is one of the many sweet recipes in the Northern part of Nigeria. It tastes so sweet and delicious that it will keep you asking for more. It is basically made with short-grain rice—the one used to make Tuwon Shinkafa. Also, it is very easy to make.
Without any further ado, let’s dive into its preparation, shall we?
Equipment for Making Sinasir
Ingredients for Making Sinasir
This northern Nigerian cuisine is prepared with the following ingredients:
Three (3) cups of short-grain rice
Two (1) cups of per-boiled rice
Two (2) teaspoons of yeast
½ teaspoon of baking powder
Four (4) teaspoons of sugar
A cup of water
Pinch of salt
Vegetable oil
Onions
Procedure for Preparing Sinasir
STEP 1: Let’s start by placing the rice in a clean bowl and adding enough water inside the rice to soak for more than 3 hours.
STEP 2: Wash the rice properly. Make it look very clean.
STEP 3: Proof the yeast by adding some warm water inside the yeast and setting it aside.
STEP 4: After washing the rice, drain off the water and rinse the rice. Then;
STEP 5: When the rinsing is done, blend the soaked rice with a little water. When done, add the parboiled rice and blend it too.
STEP 6: Mix it together and stir it very well, then add a little bit of small water and stir it until it becomes very soft.
STEP 7: After that, add a pinch of salt, sugar, and the proofed yeast. Stir together until well combined.
STEP 8: Cut the onions into small pieces and add them to the batter. The batter shouldn’t be too thick or too watery.
STEP 9: Cover it up and allow it to proof for more than 2 hours. When it is done, it is time for frying.
STEP 10: Over medium heat, place a frying pan and add a little bit of oil to the pan. Leave the oil to fry for two minutes.
STEP 11: Pour the batter into the frying pan and allow it to fry for 4 minutes. When fried, flip it up to the other side and allow it to fry for 2 minutes.
STEP 12: Take it off the heat, put it inside a warmer, and cover it so that it doesn’t get cold. Then;
STEP 13: Repeat the previous steps until all the sinasir has been exhausted.
STEP 14: Tadaaa! Your Sinasir recipe is ready.
How to Serve Sinasir
The sinasir recipe is served with vegetable soup (Miyan Alayyahu), pepper soup, and even sugar. You could also eat it with any sauce of your choice—onion sauce, egg sauce, and the like.
Remember to serve hot.
Occasions to Serve Sinasir Best
The tastiness of this meal makes it difficult for people not to serve it on different occasions like wedding ceremonies, Eid-El Fitr, naming ceremonies, birthday parties, and many more.
How to Store Sinasir
Sinasir is best stored in a cool and dry place like a warmer. It can last for 2 days. It makes it last longer when stored in a refrigerator.
Nutritional Value of Sinasir
Sinasir is a good source of energy, can help reduce the risk of cancer, prevents obesity, and is a good source of protein.
Conclusion
As you have seen, making Sinasir recipe is very easy and when done correctly, looks very appetizing and tastes delicious. Remember, do not make it too thick or too watery, or else, the batter will scatter in the frying pan.
Now that you know how to prepare Sinasir, tell me in the comments section below your experience on it.
You are always welcome to Northpad Nigeria for more local Northern Nigerian delicacies.

